If you follow this guide you will end up with a Linux Debian 10.2.0 system and a Windows 10 system that run together on the same computer at the same time. As both Linux Debian 10.2.0 and Windows 10 are free downloads, it will cost you nothing except your time. With further tweaking of the Linux system (you can find instruction videos on youtube) you will be able to run Windows games under Linux at almost the same speeds as on a pure Windows system.
Linux & Virtual Machines.
For something completely different I will have a look at the free computer operating system Linux. I had heard that one can run all of Microsoft's operating systems, including the latest, "Windows 10", within Linux itself, and, in fact, if you so desire you can run all of Microsoft's operating systems at the same time, each in a separate Linux window.
This sounded worth checking out. Something that would be fun to try.
First I needed a Linux system.
I chose Debian Linux because it is an established name, is apparently quite robust, is a free download, and a new edition of the stable version of the software had been released a couple of months earlier. Other versions of Linux have been recommended as better, but I am quite happy with Debian Buster 10.2.0. Well, I am happy with it now, but the quite deliberate sabotage of the product took some overcoming. I found this sabotage of considerable interest in its own right.
I downloaded the 3.6G installation ISO image from:
http://cdimage.debian.org/cdimage/release/10.2.0/amd64/iso-dvd/debian-10.2.0-amd64-DVD-1.iso
When Debian 10.3.0 is released the above address will probably migrate to here:
http://cdimage.debian.org/cdimage/archive/10.2.0/amd64/iso-dvd/debian-10.2.0-amd64-DVD-1.iso
Installing Debian 10.2.0, even after newer versions have arrived, will make sure that you get the same results as I did. Updates can sometimes cause programs to behave differently.
An ISO image of a DVD is just a direct copy of the DVD onto a hard-drive. Note that the amd64 in the name stands for the AMD 64-bit extension of the Intel x86 instruction set which is used by both AMD and Intel 64-bit CPUs. So, no matter if your motherboard has a 64-bit Intel CPU, or 64-bit AMD CPU, you should use this ISO image.
I burnt the ISO image debian-10.2.0-amd64-DVD-1.iso to a DVD.
I grabbed an old hard-drive to install Debian on (i.e., experiment with).
I placed the DVD in the drive and restarted the computer.
I set the boot order in the BIOS to boot first from the DVD/CDROM, then from the hard-drive.
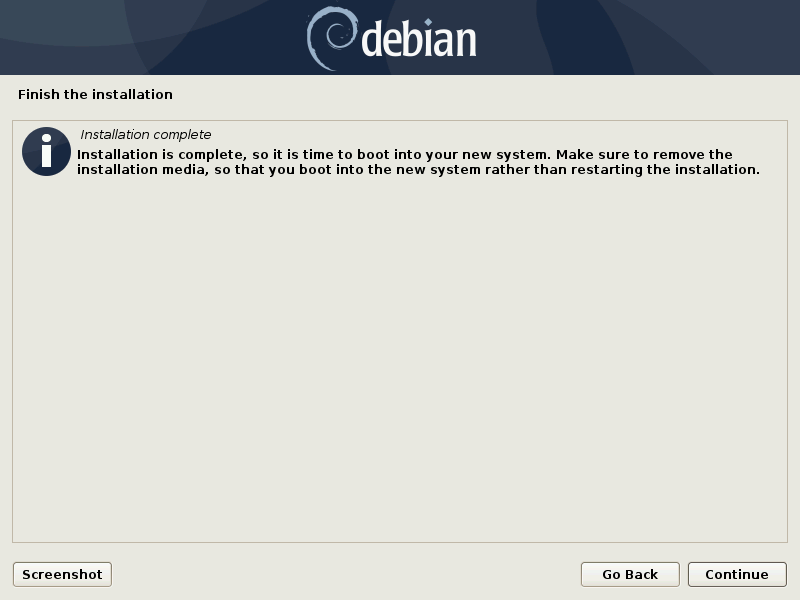
The computer booted from the DVD and the installation software presented a step by step procedure to install a Debian system. I followed the steps, and after about 30 minutes came to a screen stating that the installation was complete and that I should remove the DVD so that the computer would reboot from the hard-drive and not restart the installation. I did this and rebooted into my brand new Debian system.
And what was the outcome? A big disappointment. A black login screen.
I logged in, and looked around for instructions. Nothing.
I eventually discovered that my graphics card (like that of many others) needed certain binary drivers to make full use of it. I was told that this was the cause of being dumped to a black login screen, rather than booting into a nice GUI (graphical user interface), as I had expected. But this was not the real reason for the black login screen. The real reason only became apparent later, when I installed a much older version of Debian (Debian 5 released early 2009) and found that it booted a perfectly acceptable GUI. The old software provided a VESA driver (up to 2560x1600 resolution). VESA drivers can be used by almost all graphics cards, however, they usually provide little in the way of hardware acceleration. To obtain full hardware acceleration you usually need a binary driver from the graphics card producer.
This made it crystal clear that being dumped to a login screen was not a necessity of the hardware, but a deliberate choice of (certain) Debian software maintainers. These folk knew perfectly well that a large percentage of those trying Debian for the first time would end up with a black screen, and with no further instructions to be found, would probably form a very poor opinion of Debian Linux, and probably of Linux generally. And these Debian software maintainers are apparently happy with this.
You may ask why Debian software maintainers would sabotage their own product. Well, that is a good question, but the evidence that they do, is overwhelming. This sabotage is not only found in Debian, but, to a greater or lesser extent, in Linux generally.
Overall, I have found that Linux is an excellent product. Considering that it will not cost you a cent, it is an absolutely amazing product. I have also found that certain Linux features are continually sabotaged. Since, in general, this sabotage has to be accompanied by a plausible reason for the sabotage, it is often possible to work around it. And, once you are away from the hot-spots of sabotage, everything works reasonably well.
Anyway, getting back to the installation. In the event that you will need a binary driver for your system, download one of the following 79M archives (you only need one; .zip is for Microsoft users; .tar.gz for Linux users) of binary driver packages:
http://cdimage.debian.org/cdimage/unofficial/non-free/firmware/buster/20191116/firmware.zip
http://cdimage.debian.org/cdimage/unofficial/non-free/firmware/buster/20191116/firmware.tar.gz
Copy the archive to a USB stick, and unpack it there. Linux users can unpack them with
unzip firmware.zip
tar xf firmware.tar.gz
A full list of files in the firmware archive can be found here.
As a matter of policy, Debian refuses to include non-free software (programs for which the source code is not available) in its official distributions, as they cannot be sure there are no back-doors, etc, in it. This is quite reasonable, but this policy has also been used to ensure first time users are presented with a lesser product.
A guide to the installation of Debian 10.2.0.
1) Prepare the installation DVD and USB stick as indicated above.
2) Choose a hard-drive to install on. The installation will delete all the data on at least one partition of the hard-drive. You will be given plenty of warning before any data is deleted. It is safer, although not necessary, to unplug all but the hard-drive you plan to install Debian on.
3) Turn on your computer.
4) Look about the boot up screen to find the correct key to push to enter the BIOS. In my case it is the Delete key. Enter the BIOS and make sure that the boot order is first from the DVD, then from the hard-drive. Save the BIOS configuration. In my case with the key F10.
5) Place your Debian 10.2.0 DVD into the DVD-drive. (It might be easier to have the DVD loaded before turning on your computer.)
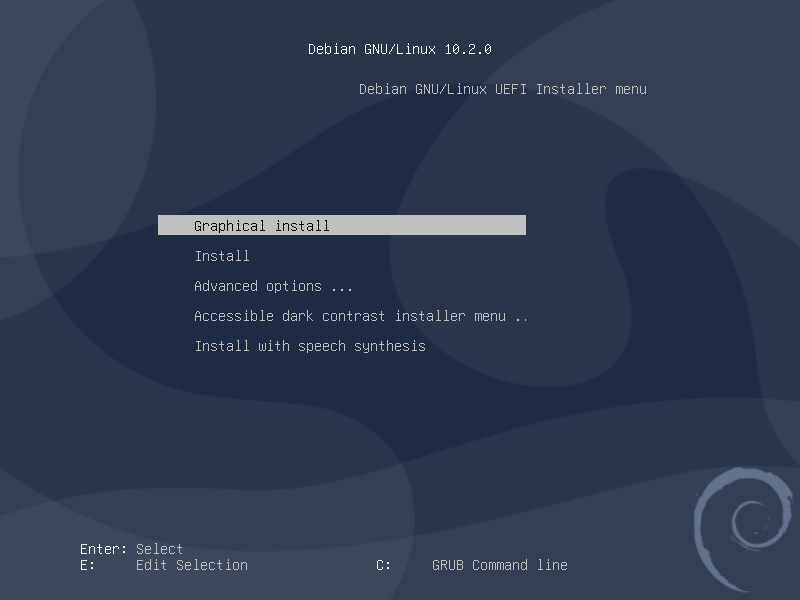
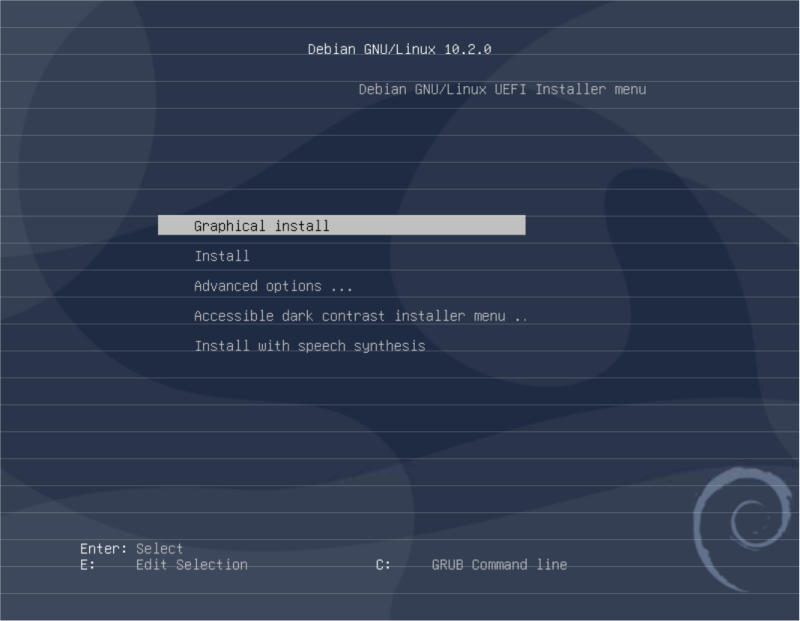
Your computer will boot from the Debian installation DVD. You should see the following:
If you have an older computer, or if you are installing to a virtual machine, you may see:
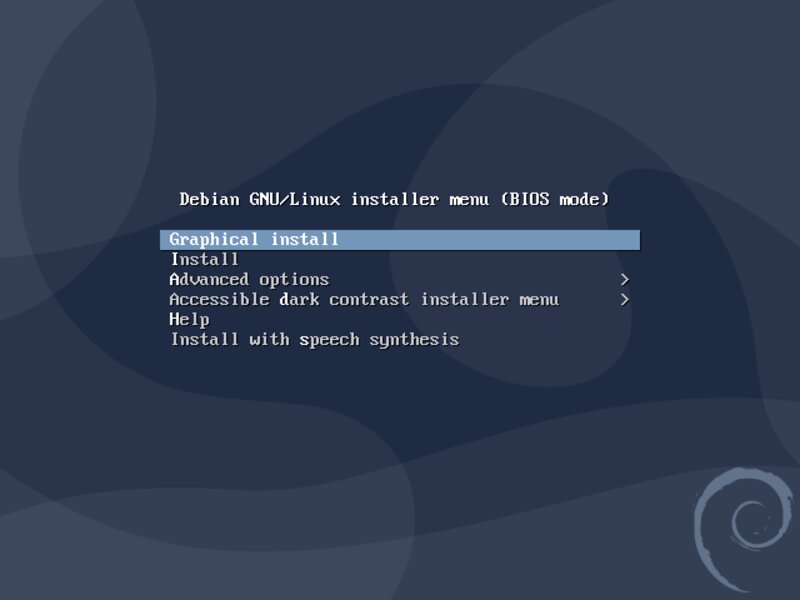
The difference being that the installation software has decided that a UEFI (Unified Extensible Firmware Interface) boot is possible in the first case and a BIOS (Basic Input/Output System) boot is possible in the second. I could not get UEFI to work for my computer, but BIOS works fine. In general BIOS works better as it is older and more bugs have been ironed out.
If you are intimidated by the flood of images below, just choose the "Graphical Install". It hides some of the detail from you. It is more like a Windows install.
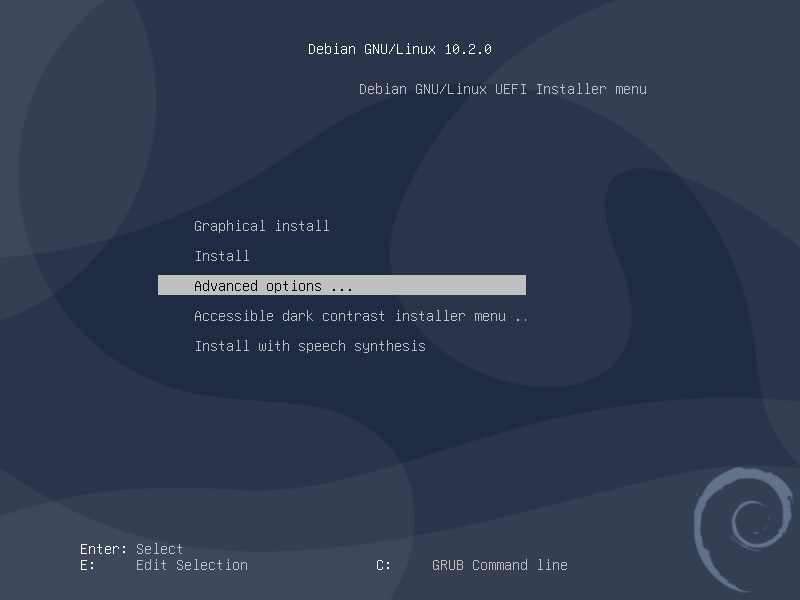
Initially I choose "Graphical Install" but since the "Graphical expert install" which is found under "Advanced options", is not that much more difficult, I will follow that.
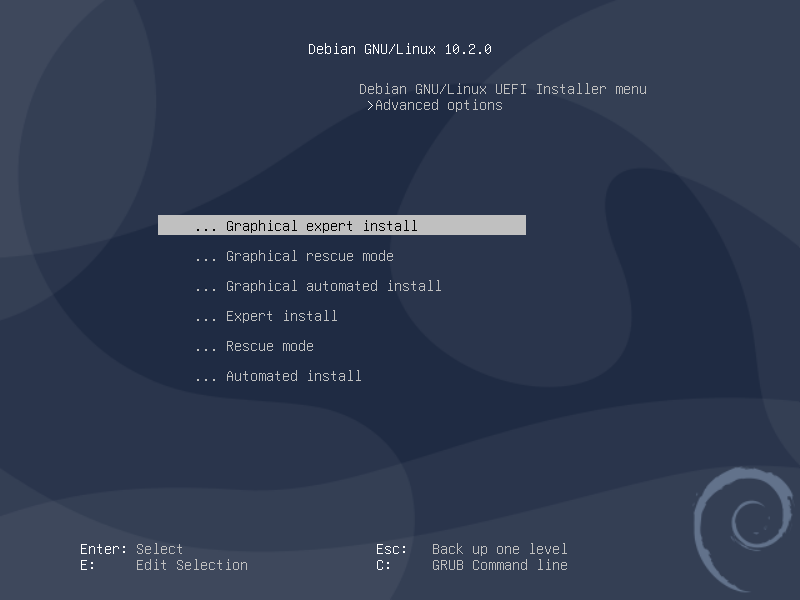
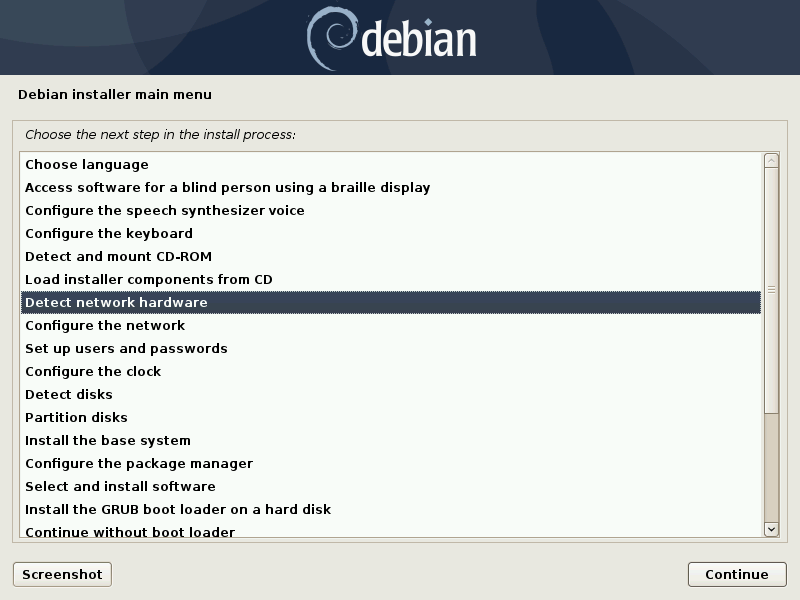
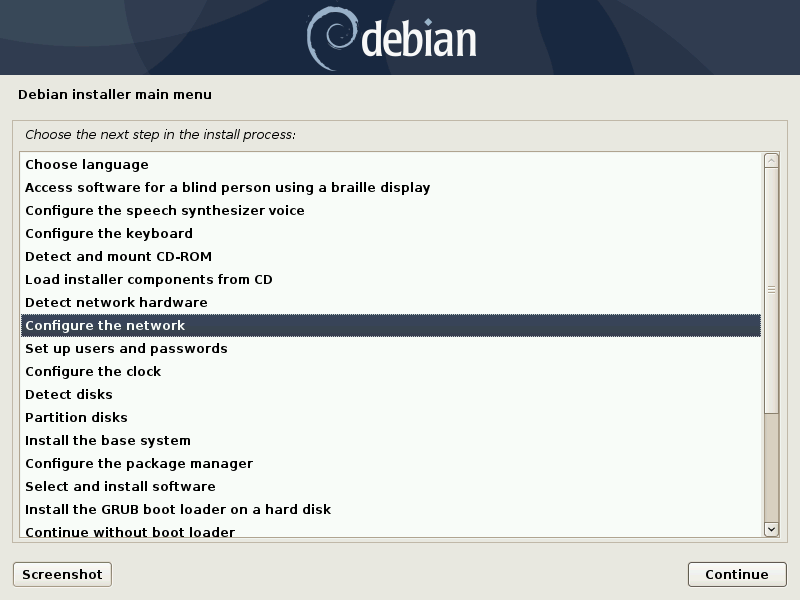
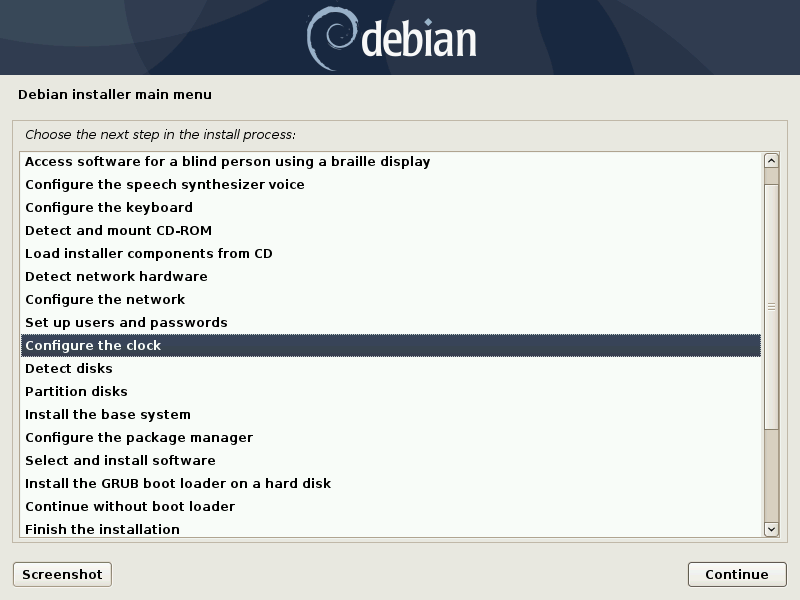
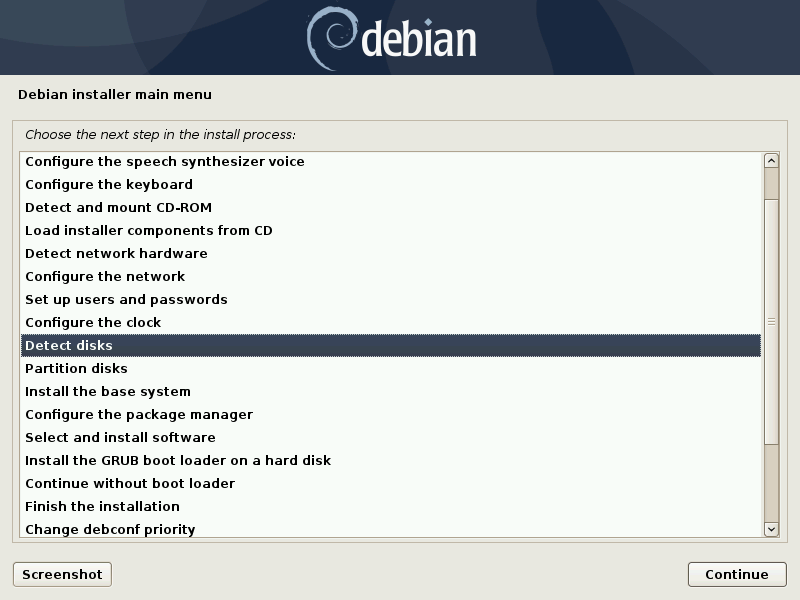
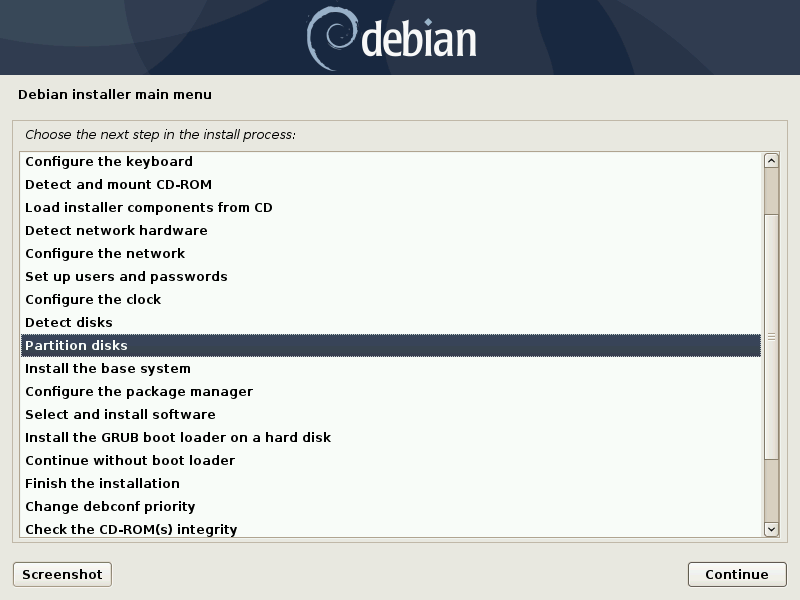
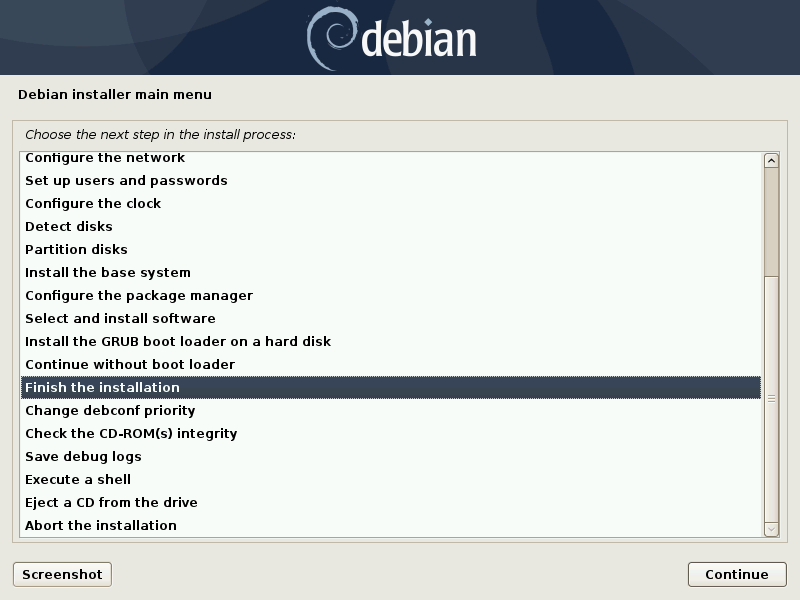
After choosing the "Graphical expert install" you are presented with a list of tasks:
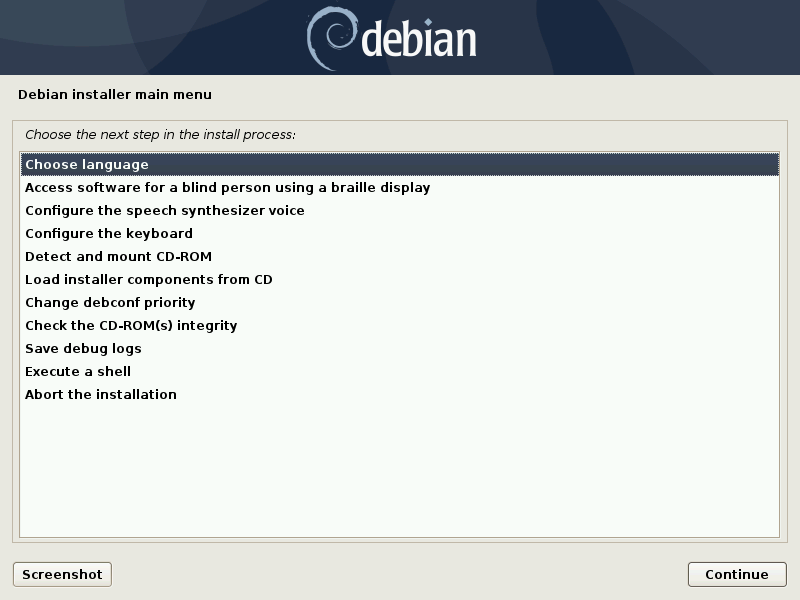
Highlight the option you desire (often it is already highlighted for you) then click "Continue".
Alternatively, you can double click on the chosen option.
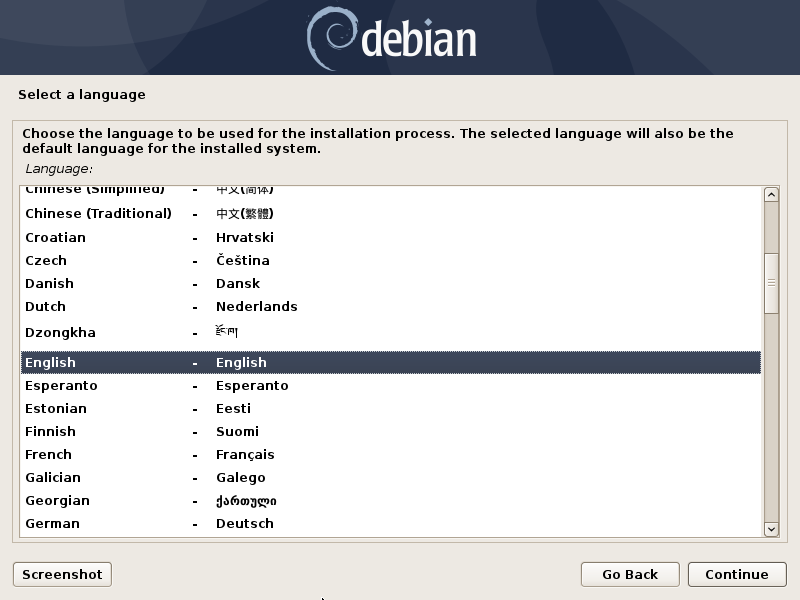
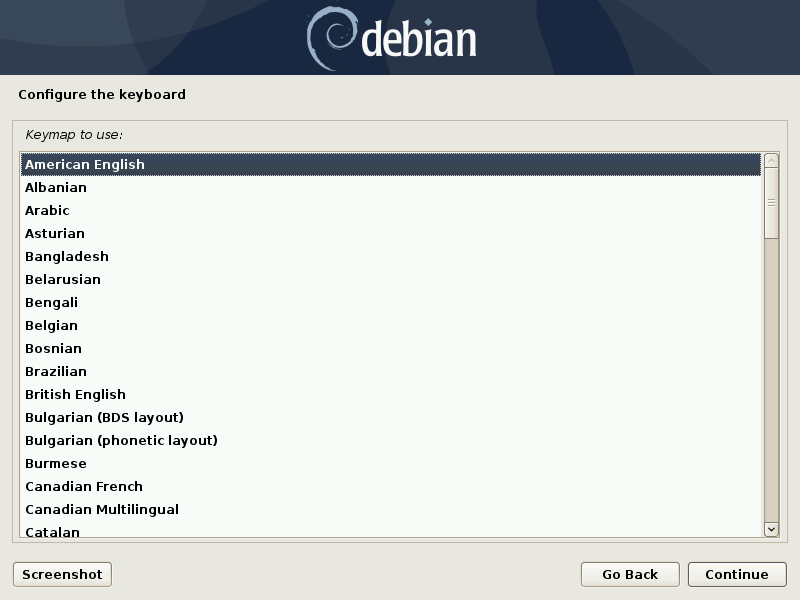
Choose your language.
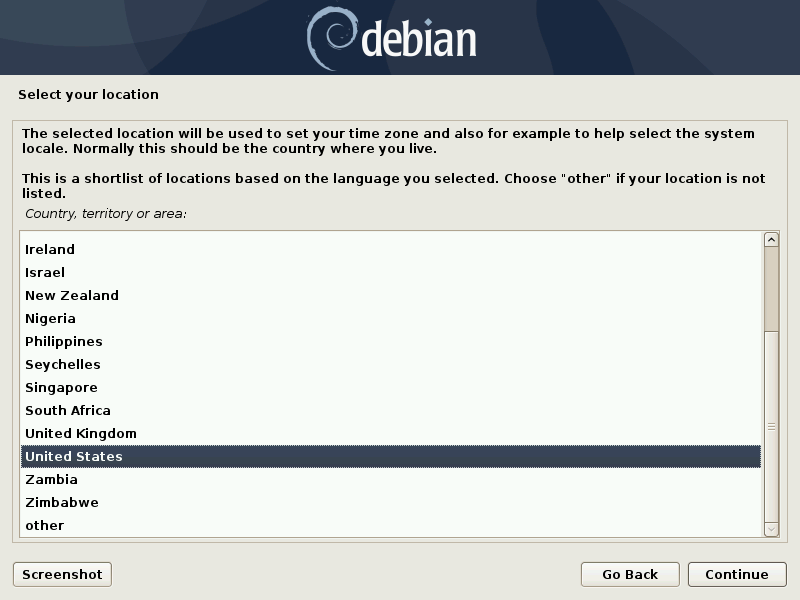
Choose your location.
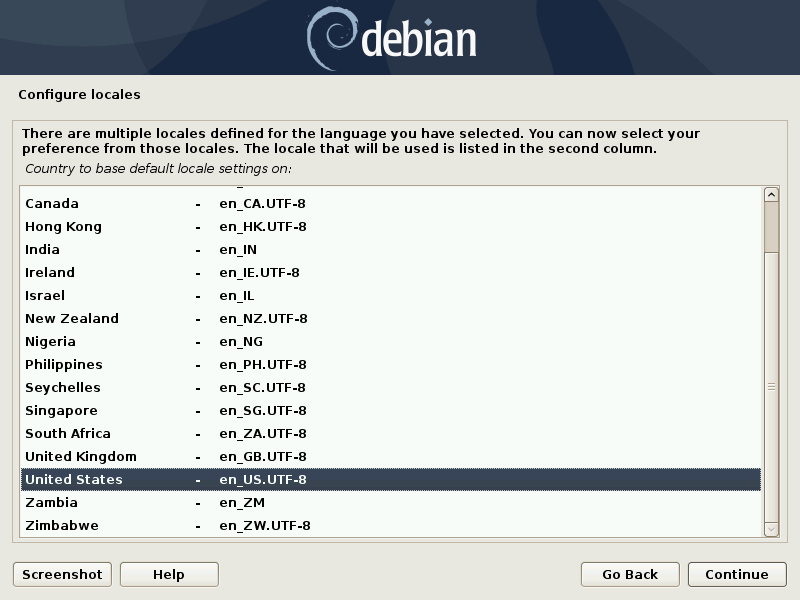
Choose the locales for your location.
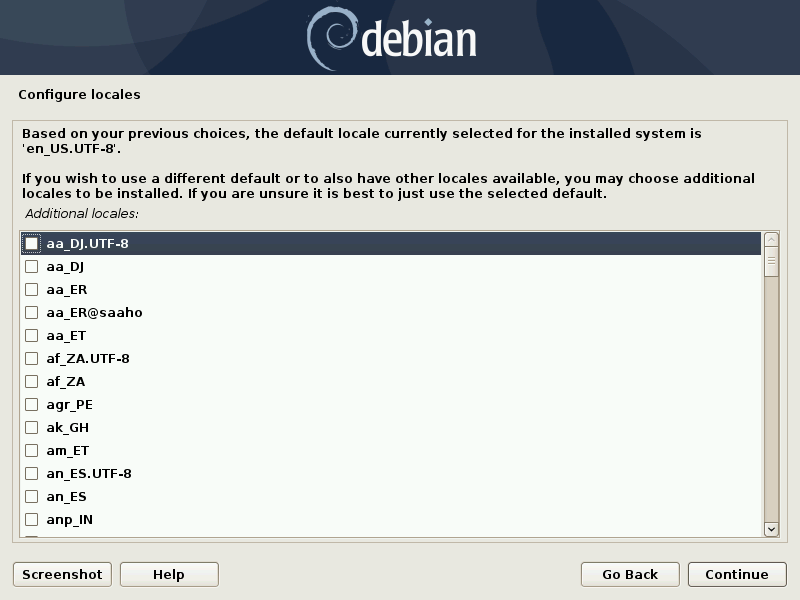
You can also choose other locales.
After this you will be returned to the main menu.
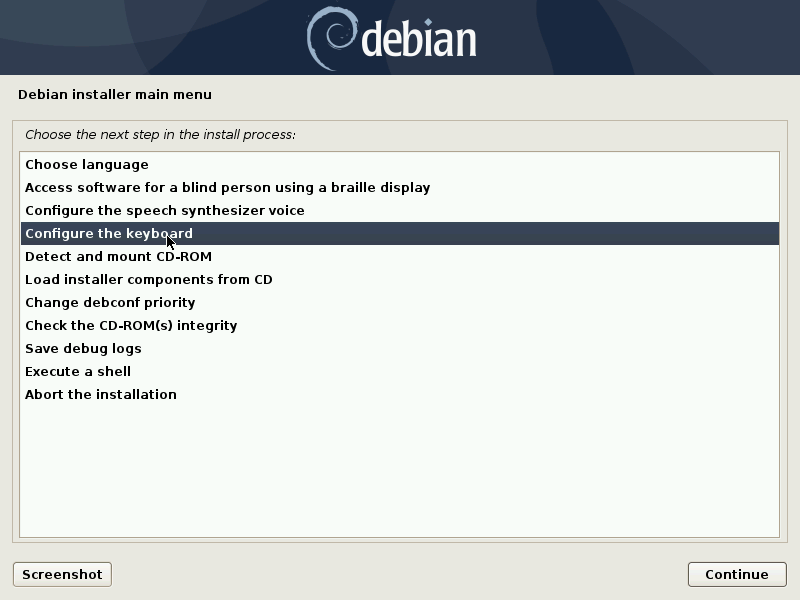
If you need of a braille display or speech synthesizer you can configure them here. Otherwise just skip these options, and configure your keyboard.
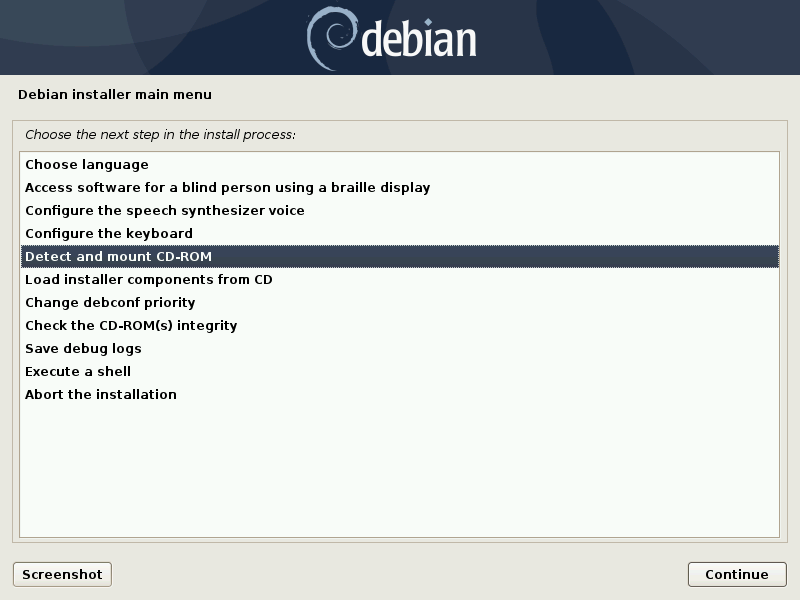
Click "Continue" or double click on "Detect and mount CD-ROM".
Click continue.
Click continue.
Click "Continue".
Most will just click "Continue". Choose any of these you think you might need. You might want to investigate the "load media" option. I just noticed it. I have read that certain WIFI cards need binary drivers to connect to the internet during the installation. Maybe this is where you add them. Anyway, it doesn't matter because installation without the internet is fine.
Click "Continue".
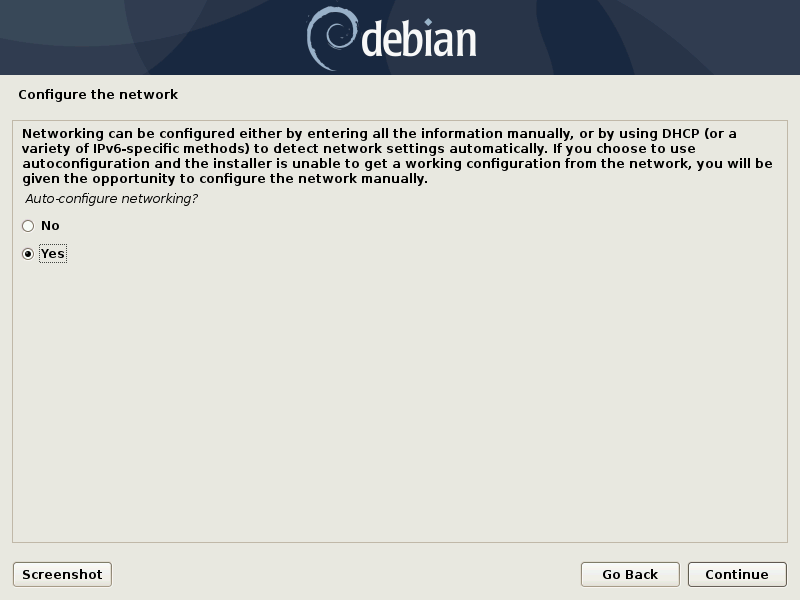
Most will choose "Yes". A DHCP (Dynamic Host Configuration Protocol) server will be set up on your computer to assign an IP (Internet Protocol) address and to provide access to DNS (Domain Name Server) servers. It is called Dynamic because theoretically the IP address can change, although, on a stand-alone computer it will probably always be the same.
Choose "No" if you wish to assign static network addresses. You will have to choose an IP address for your computer. This is determined by the internal network address, or gateway address, of your router. For example, if you router's internal address is 192.168.1.1 then you can choose any address from 192.168.1.2 to 192.168.1.254. Below, is a typical setup.
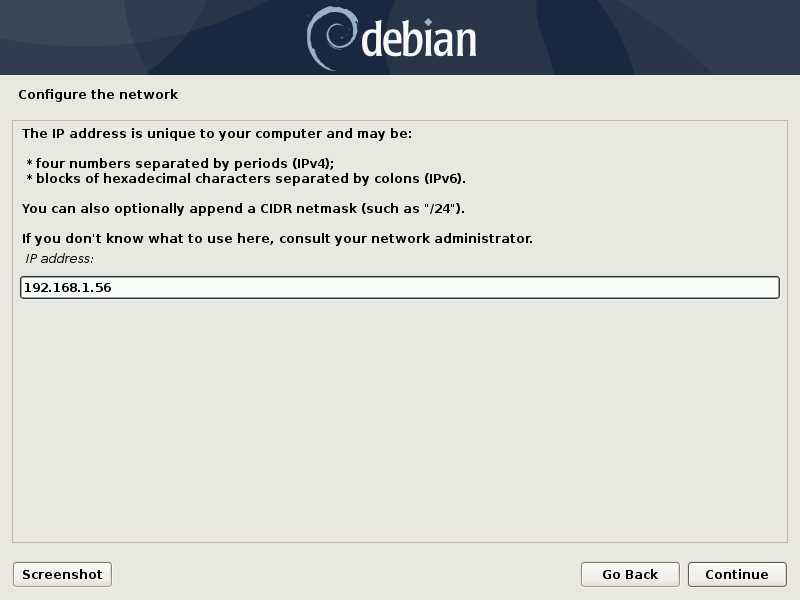

255.255.255.0 will be fine for nearly everyone.
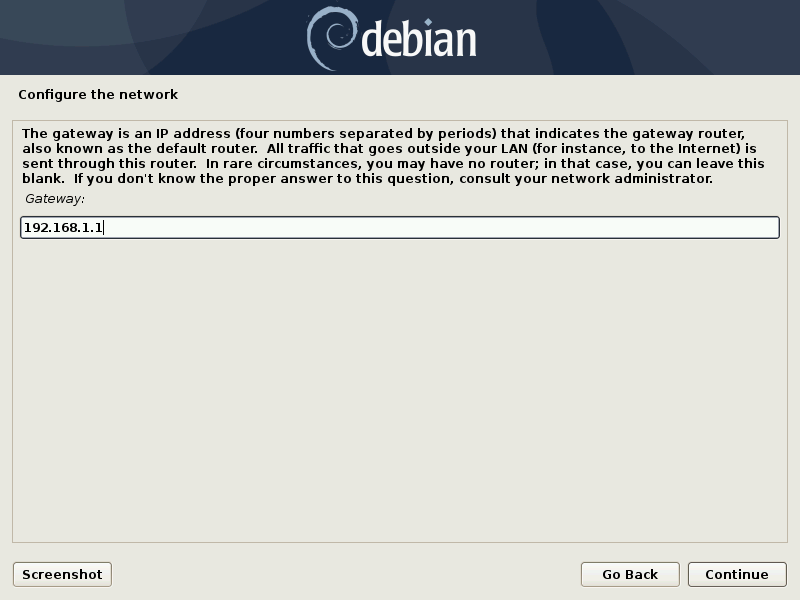
This needs to be the correct address of your router. See your router manual.
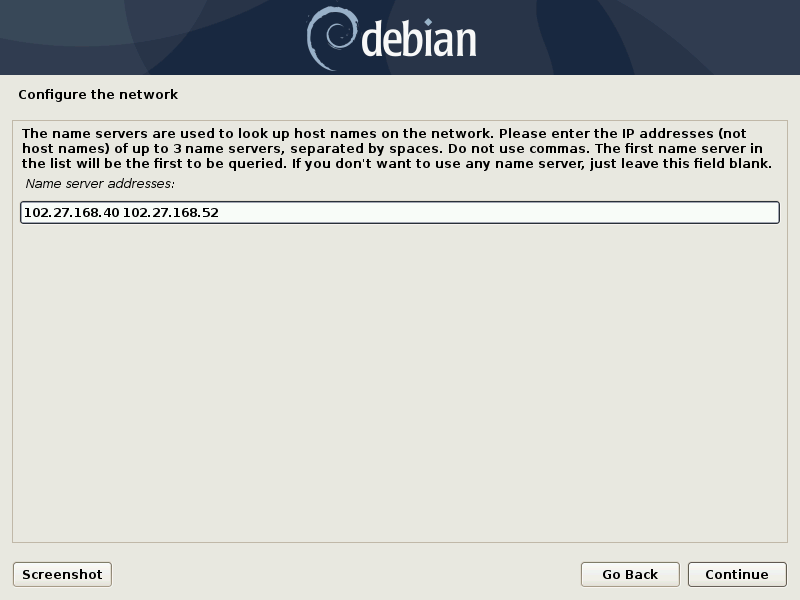
Your internet provider will provide you with two or three addresses of Domain Name Servers. These servers are computers that translate names like www.google.com to the numbers which routers use. Apparently, you can use the router's address and the router will take care of things. I still haven't got around to verifying this yet. So, if you need to, try it and see.
Do not use the above addresses as I have made them up.
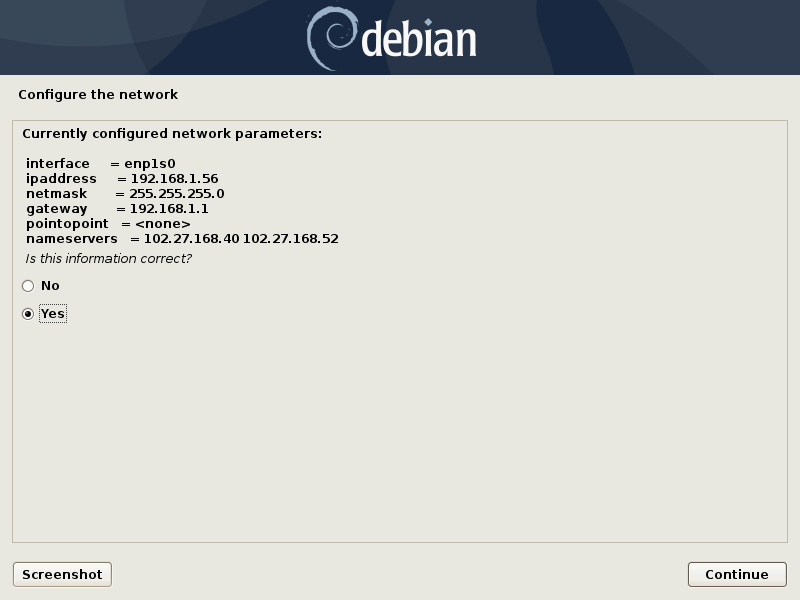
The entries of this section are passed to the network manager called NetworkManager and will be used to connect to the internet on your new system. If you ever need to reconfigure your network, you right click on the network icon in the system tray, choose "Configure Network Connections", click on IPv4, and/or IPv6, choose static or automatic. If static, enter your new version of the above data. If automatic you may wish to add your internet provider's DNS addresses (instead of those chosen for you). You can check the status of NetworkManager with:
systemctl status NetworkManager
Internet with NetworkManager works out of the box. You should set up a firewall. I initially installed Debian without an internet connection, and accidently entered an incorrect network address, thus NetworkManager did not work for me. In my attempt to get the internet working, I discovered that you can also configure your network by editing the file /etc/network/interfaces. For a static setup add something like:
# The primary network interface
auto enp1s0
iface enp1s0 inet static
address 192.168.1.56
netmask 255.255.255.0
network 192.168.1.0
broadcast 192.168.1.255
gateway 192.168.1.1
# dns-* options are implemented by the resolvconf package, if installed
dns-nameservers 102.27.168.40 102.27.168.52
dns-search domain
You then bring up the ethernet connection with the command: ifup --all
To get a DHCP connection you replace the above with:
# The primary network interface
auto enp1s0
iface enp1s0 inet dhcp
iface enp1s0 inet6 dhcp
However, since NetworkManager works out of the box you should probably use it.
Next you set the maximum time you wish to wait for a connection. The default should be fine.
Then set a name (the hostname) for your computer. The default is debian. This name will end up in your console prompt, e.g., john@debian>.
Then set the domain-name. For a home system this is irrelevant so just leave this blank.
I spent a lot of time investigating how to set a nice console prompt, so I may as well say a little about it. Here is my prompt for the Debian 5 chroot environment
PS1="\[\e[32;1m\](deb5 chroot) \[\e[34m\]\u@\h \[\e[31m\]\w/\[\e[m\]> "
Copy and paste that into a console, hit enter, and you will get a prompt like this:
(deb5 chroot) john@debian /media/cdrom/>
\u is the username; \h is the hostname; \w is the current working directory. Note that double clicking on the name of the current working directory will copy it so that it can be quickly pasted where needed. I have found this very useful.
See man bash for more on this (search for ^PROMPTING).
\e or \033 is the escape character.
The sequences \e[ .... m set display attributes. For example,
\e[31m begins red text,
\e[31;1m begins bold red text,
\e[31;1;4m begins bold underlined red text,
\e[31;1;4;44m begins bold underlined red text on a blue background,
\e[31;1;4;44;5m begins flashing bold underlined red text on a blue background, and
\e[m = \e[0m changes it back to ordinary text.
See man console_codes for more on this.
The above sequences work well to change the display attributes but do not work well with the up and down arrows used to scroll through previous commands. These need to know which characters in the prompt are to be displayed and which are not. To achieve this the non-printing characters are placed between \[ and \].
To make this change permanent, you need to add your new PS1 definition to your ~/.bashrc file. Files beginning with a dot are not shown by ls. Use ls -a to include dot-files.
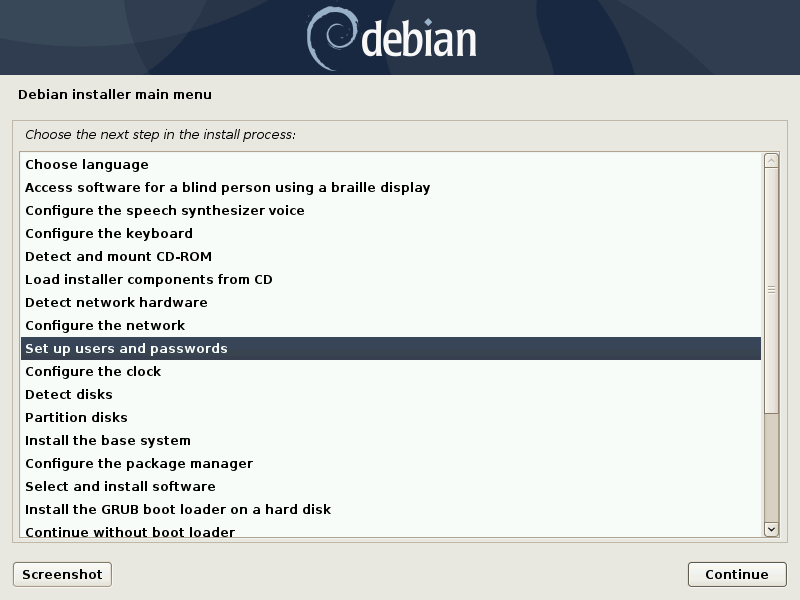
Set up a root (privileged) account and also a user (normal) account. You must remember, at least, the root account password. I would choose something easy to remember, and change it to a secure password later, with the command passwd. The root account can also change the password of any user account with a command like passwd john.
This sets your hardware clock to the time found by a NTP (Network Time Protocol) server. I think I chose "No" but it was installed anyway. If you don't want it you can turn it off later with:
systemctl disable systemd-timesyncd
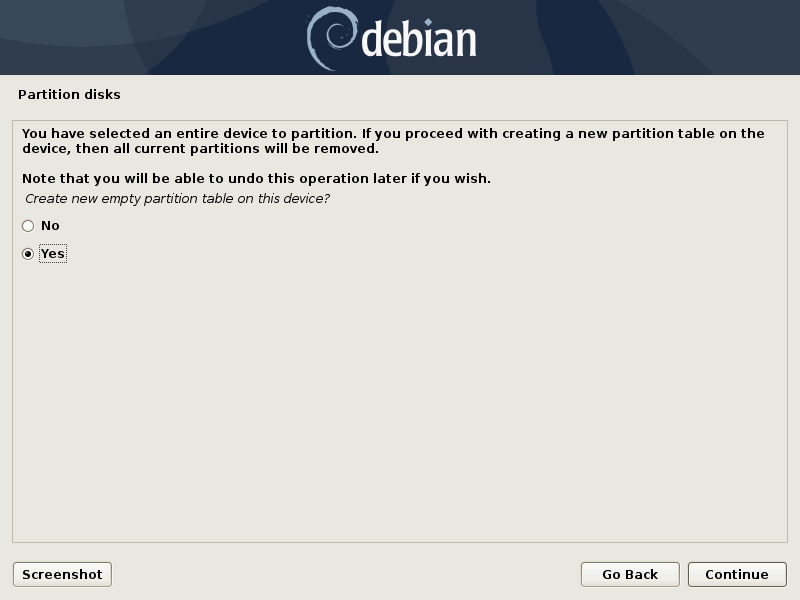
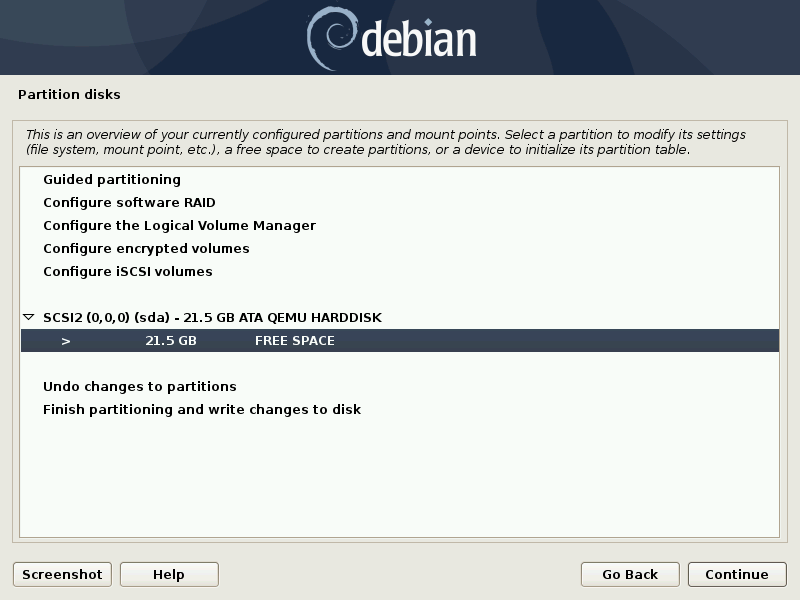
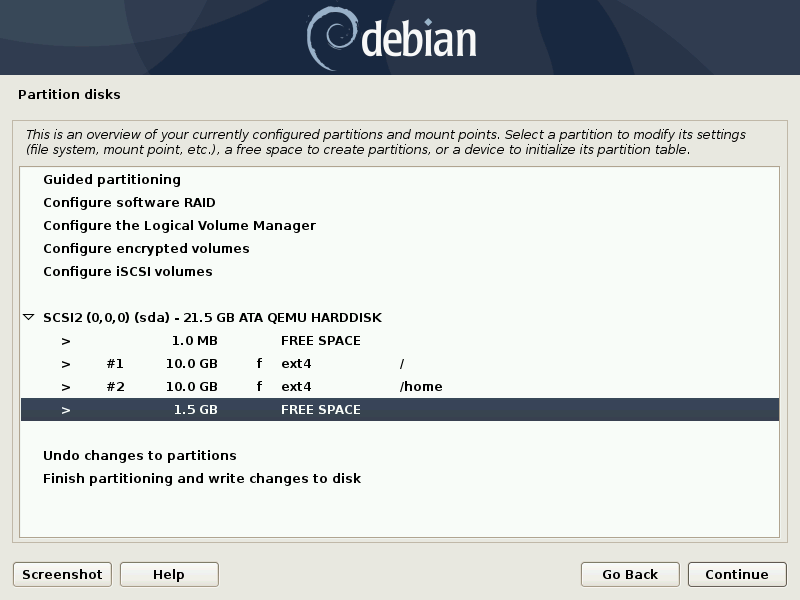
Initially, I found the partitioning section a little confusing to use. Just remember that you have to choose the option you want before clicking "Continue" (or double click on the option you want).
The images here are from an installation on a virtual machine. The virtual hard-drive used is a small ATA QEMU drive. First I tried using the guided partitioning of the entire hard-drive.

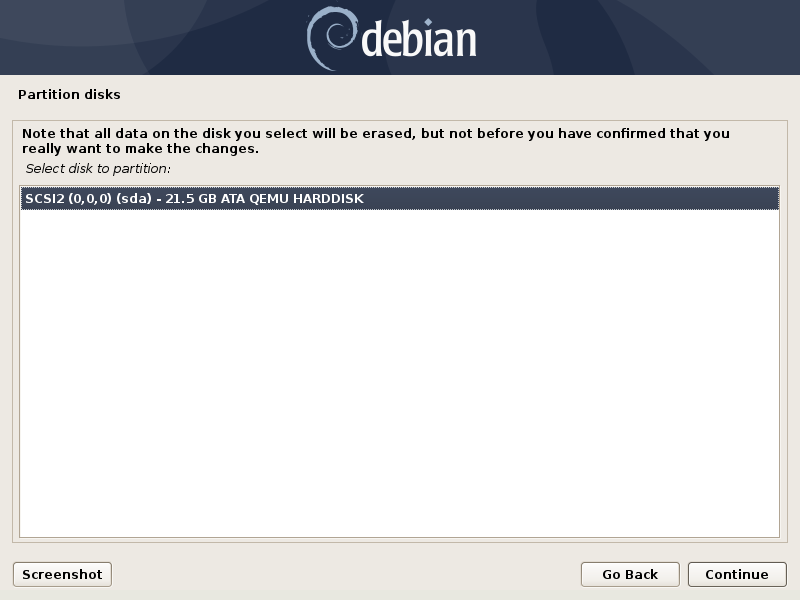
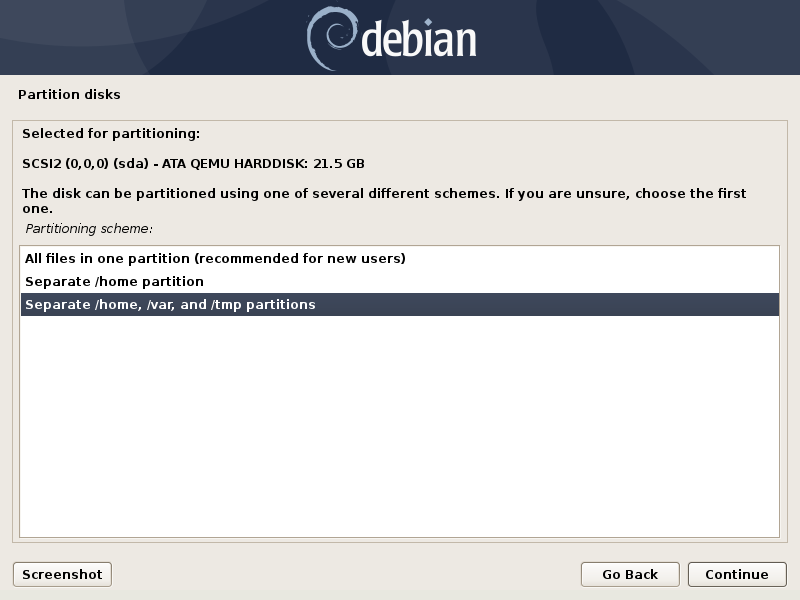
Since I was just looking around, I choose an option involving a lot of partitions.
This is what you get if UEFI firmware has been chosen for you
Note the EFI (same as UEFI) system partition (ESP).
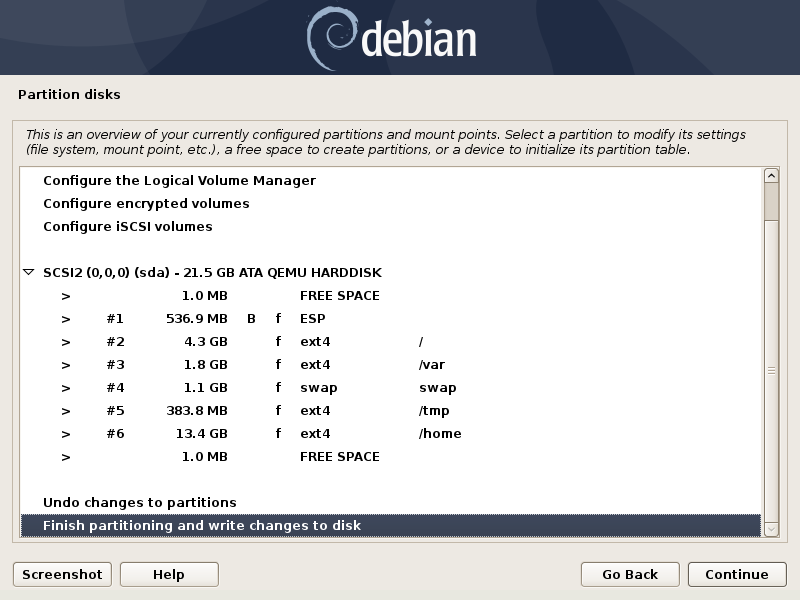
This is what you get if BIOS firmware has been chosen for you

This partitioning indicates the use of an msdos partition table, which you do not want unless your computer is very old. If your hard-drive is larger than 2TB then you MUST have a gpt partition table or you will only be able to access the first 2TBs of your drive. If your hard-drive is larger than 2TB, then apparently the installer program will, in fact, choose a gpt partition table. In any case, you can always add a gpt partition table if you choose the "Manual" option.
If your hard-drive already has an msdos partition table, then you should probably stick with it, as changing to a gpt partition table will destroy all the data on the drive.
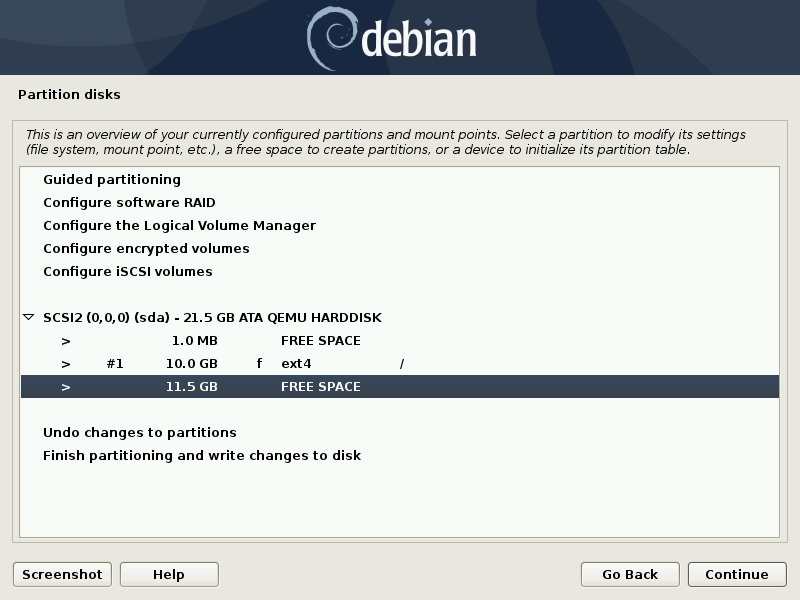
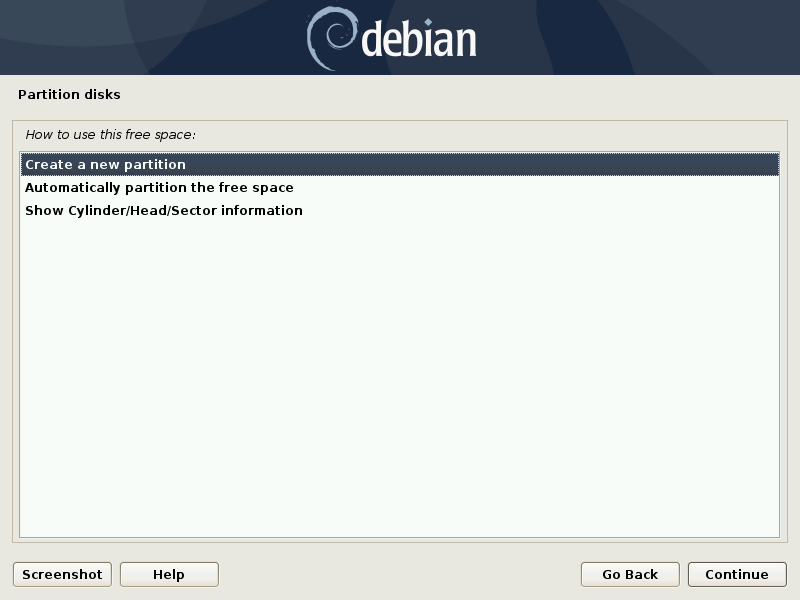
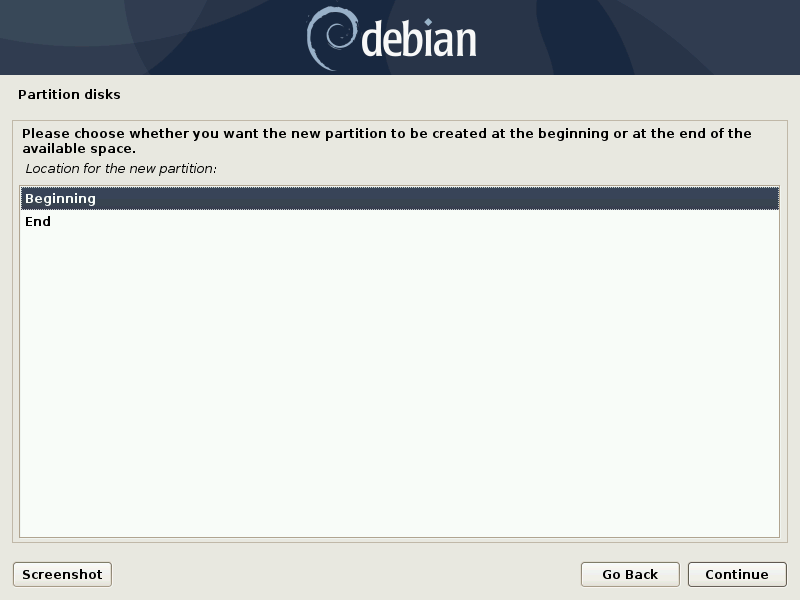
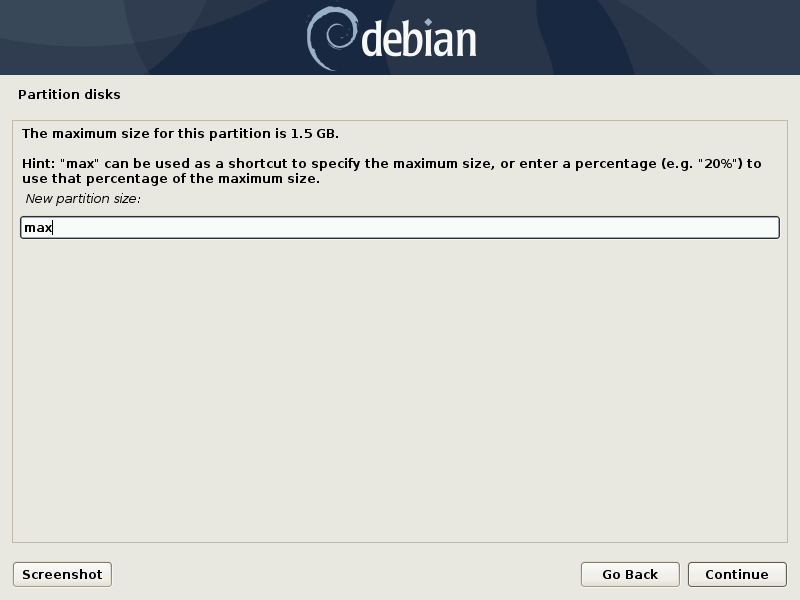
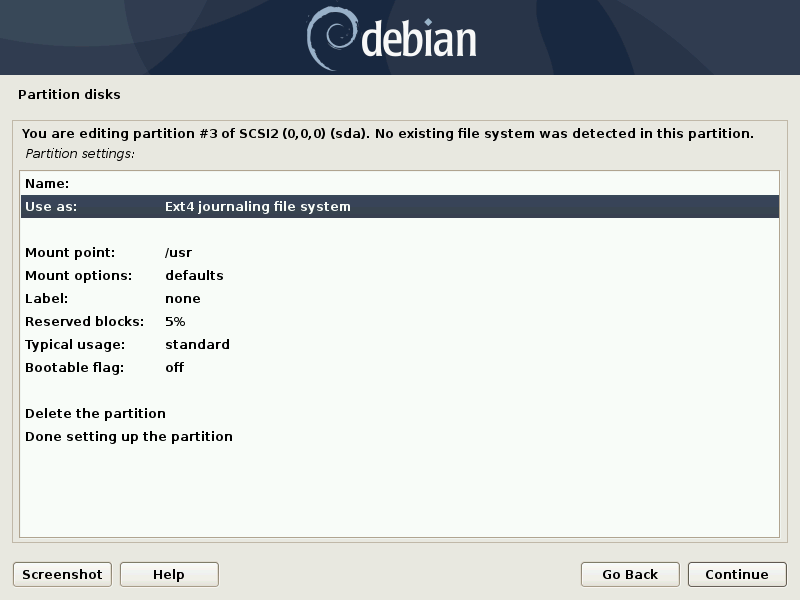
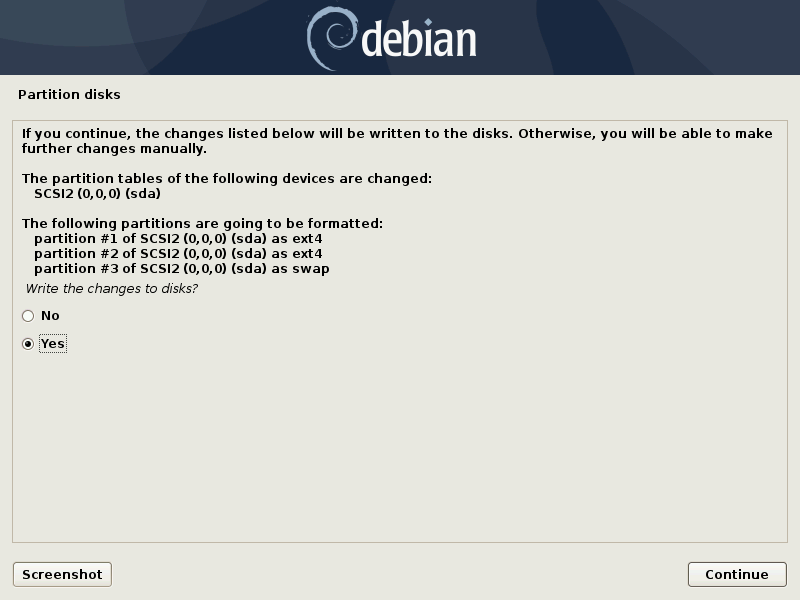
The next 22 images illustrate how to manually partition a hard-drive using Debian's installer. Of course, your partitioning will be different, but this should give you a feel for how it is done. Not all the options are investigated. You should hunt around and see what is possible.
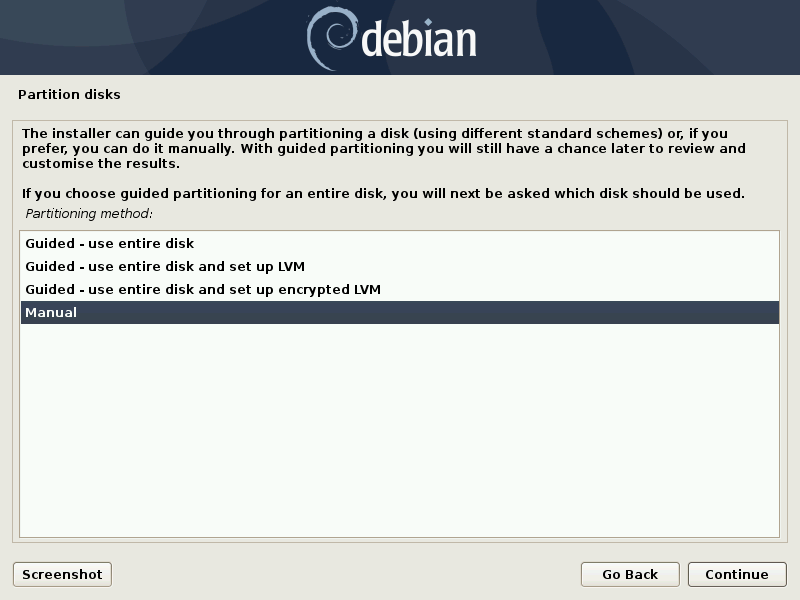
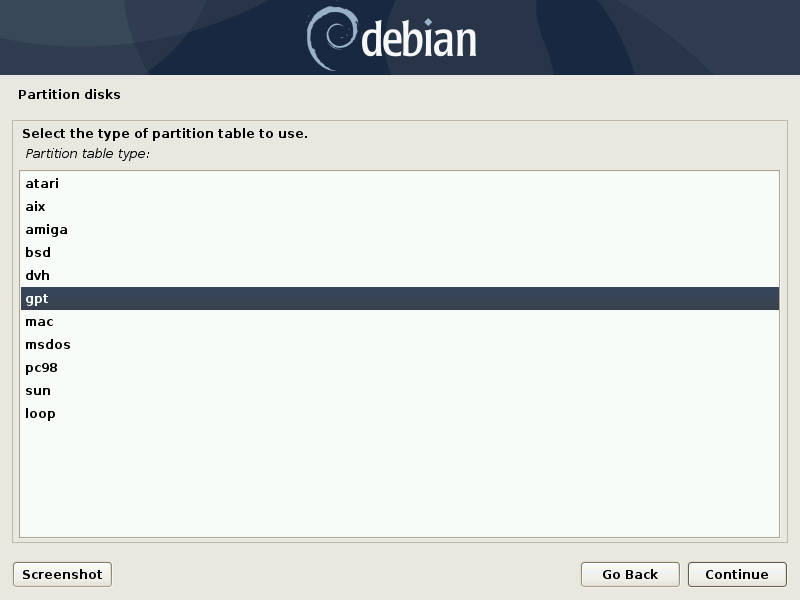
If your hard-drive is larger than 2TB you HAVE TO use a gpt partition table.

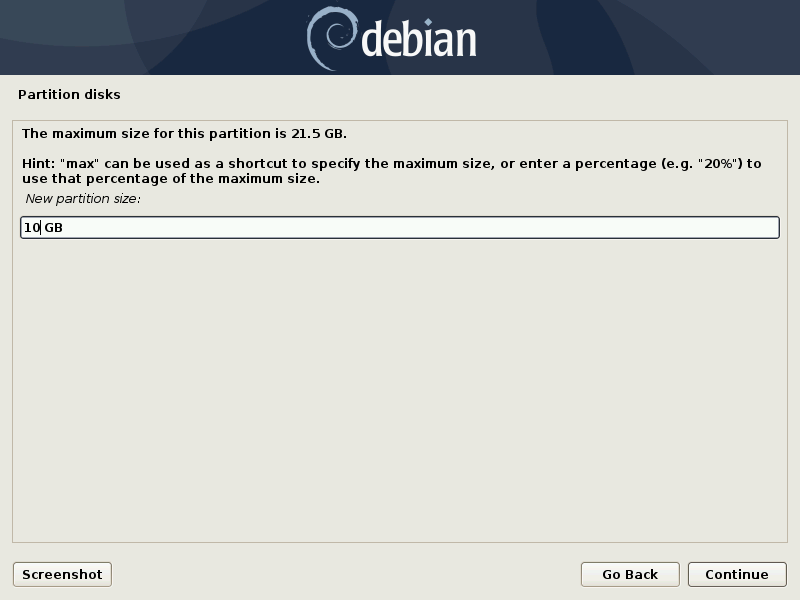

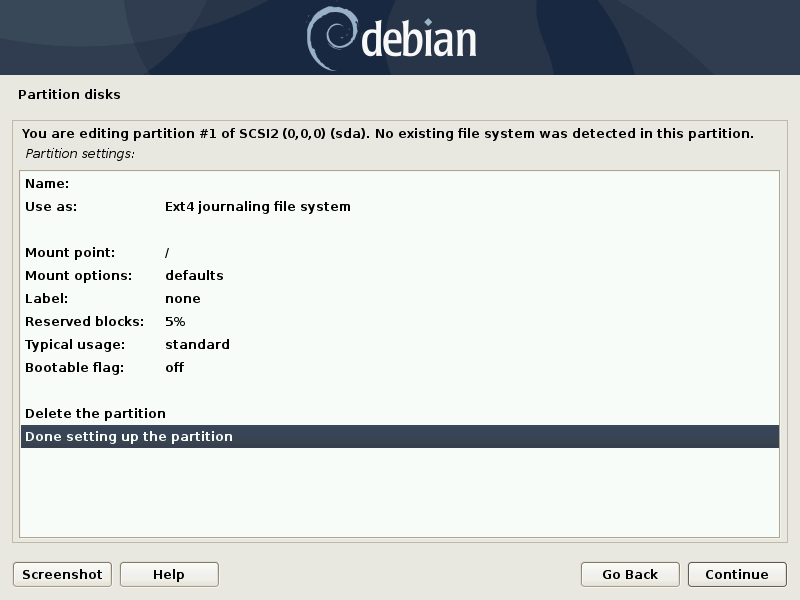
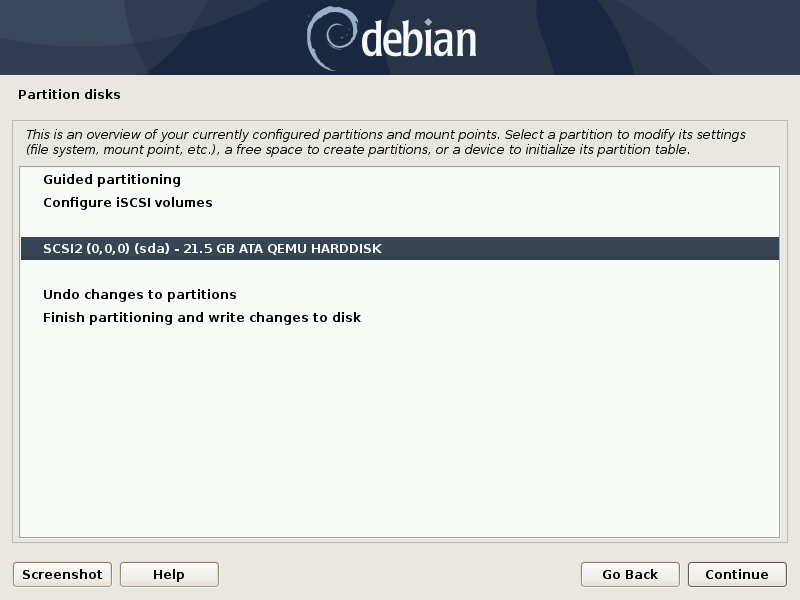
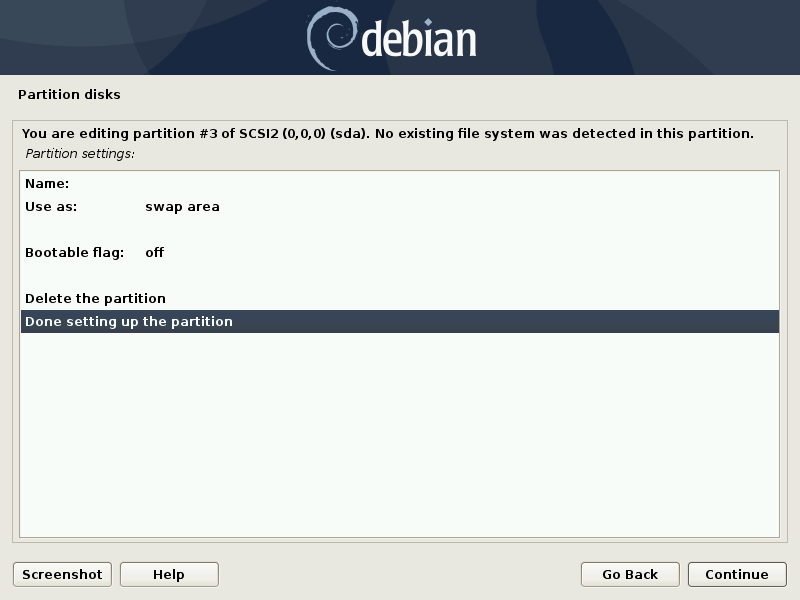
The Mount point: / indicates that this partition is the root partition. This is the partition where the system files will be kept. It is the only required partition. If you have only one partition then you need a swap file. However, creating an extra partition for a swap area is recommended.


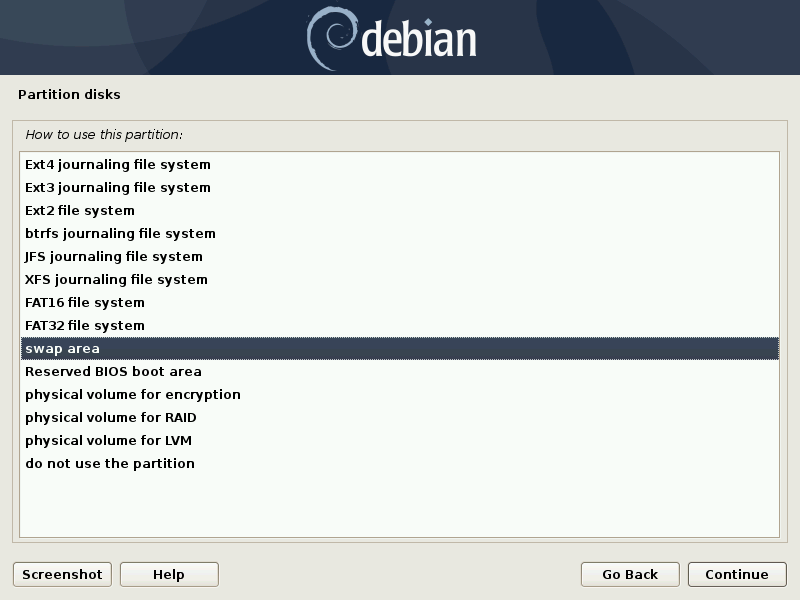
The swap partition holds memory pages that are temporarily inactive. Swap space is used when your operating system decides that it needs physical memory for active processes and the amount of available (unused) physical memory (RAM) is insufficient. When this happens, inactive pages from the physical memory are then moved into the swap space, freeing up that physical memory for other uses. The size of a swap partition depends on the amount of RAM.
A 1GB swap partition for 1GB of RAM.
A 2GB swap partition for 4GB of RAM.
A 3GB swap partition for 8GB of RAM.
A 3GB swap partition for 12GB of RAM.
A 4GB swap partition for 16GB of RAM.
A 5GB swap partition for 24GB of RAM.
A 6GB swap partition for 32GB of RAM.
A 8GB swap partition for 64GB of RAM.
For more on this see https://help.ubuntu.com/community/SwapFaq.
Like Windows you can use a swap file, but a swap partition is recommended.
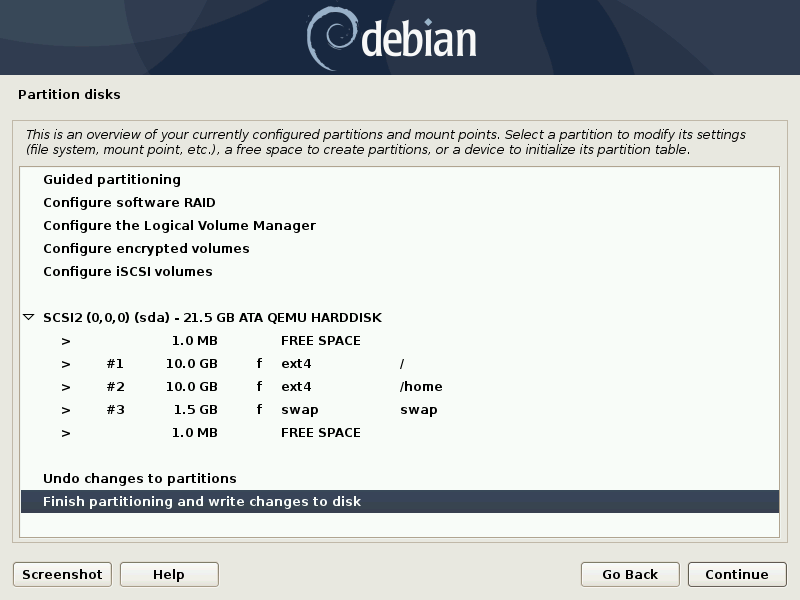
The free space (about one megabyte) at the beginning and end of the hard-drive is necessary to align the partitions correctly. Correct alignment saves ware and tear on your hard-drive.
This ends the section on manual partitioning.
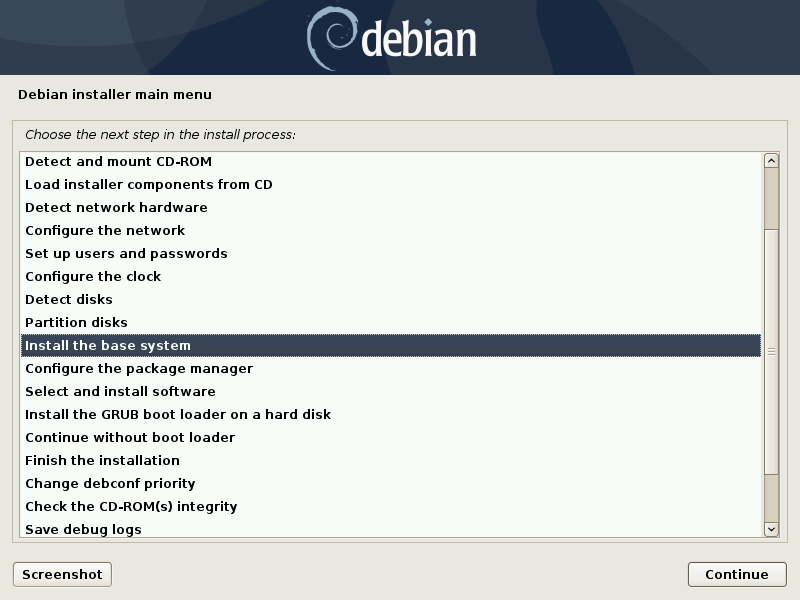
Next you need to install the Debian base system.
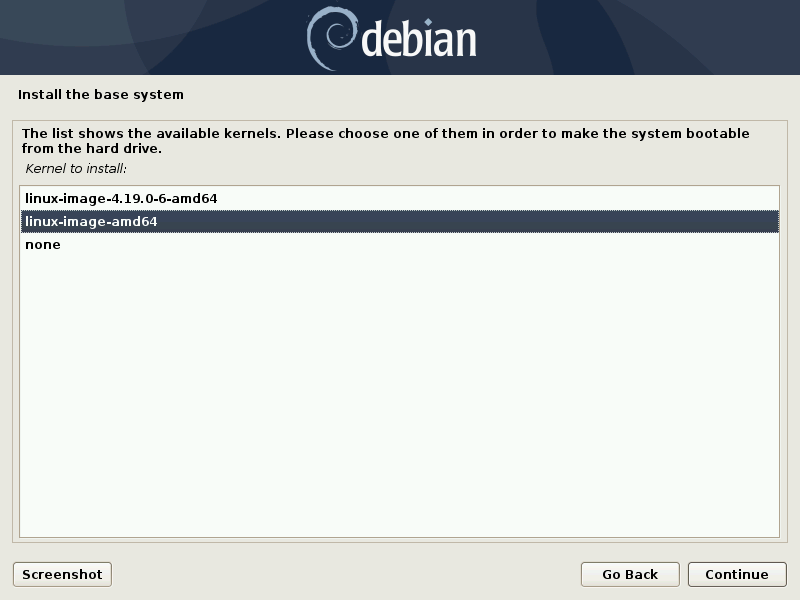
Choose a kernel. The default is fine.
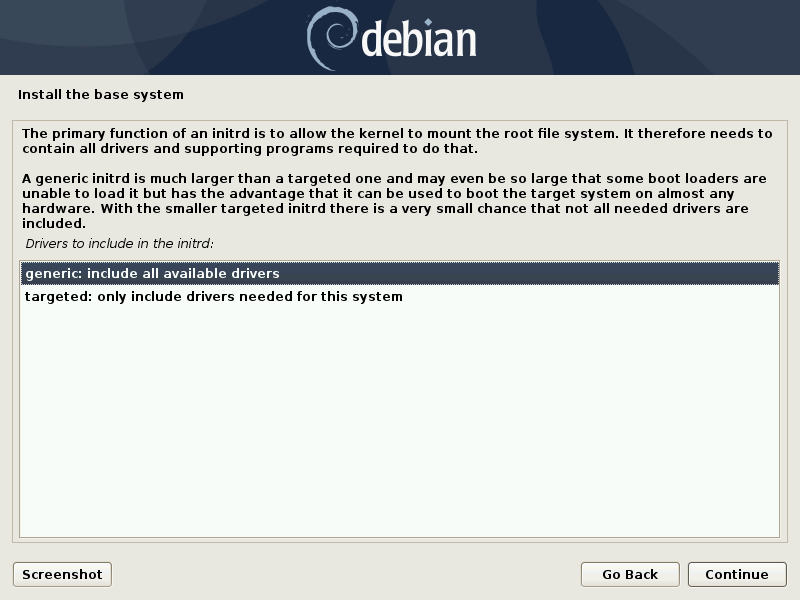
Choose "generic: includes all available drivers". It is true that a generic initrd is much larger than a targeted one, but this is essentially irrelevant. The initrd is like a directory that contains drivers (modules). The kernel searches in this directory to find drivers when it needs them. So, it is much better to have all the drivers available than to save a fraction of a second by having the kernel search a smaller directory to find a driver.
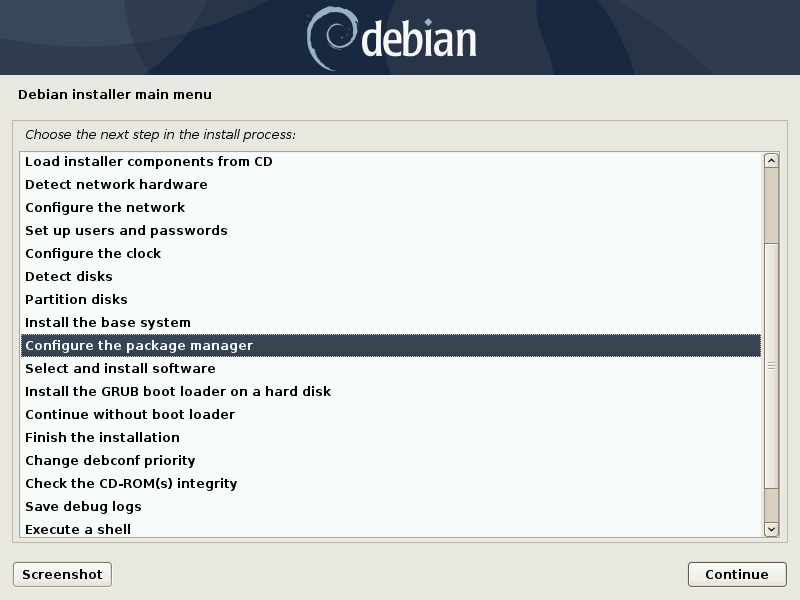
Configure the package manager.
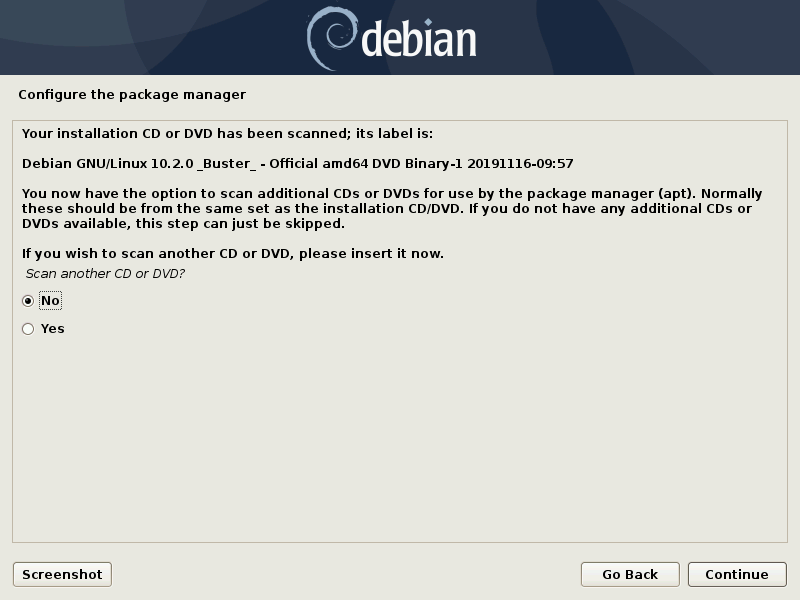
If you have downloaded more package DVDs you can add them here.
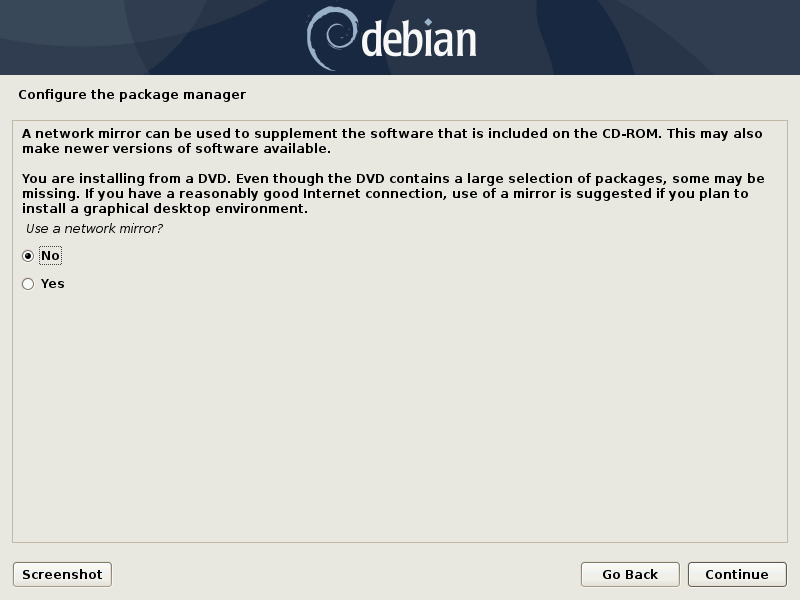
A Debian network mirror, or repository, is a computer from which you can download (via the internet) the many thousands of packages not on the installation DVD. A list of Debian mirrors can be found here. You will usually choose the mirror which gives you the fastest download speed. Of course, you can't judge these download speeds during the installation so choose a generic option like deb.debian.org and change it later.
If you say "Yes", and you are connected to the internet, then the following extra packages will be downloaded from the mirror and installed on your system. If you say "No" you can always install those packages you want later. Note that the size of the installation DVD is only 3.6G as opposed to 4.4G for all the other package DVDs (except the last). Since the extra packages total less than 20M they would easily fit onto the installation DVD, but apparently this was not wanted.
apt-config-icons-large
debconf-kde-helper
feathernotes-l10n
hexchat-perl
hexchat-plugins
hexchat-python3
kaccessible
libgle3
libk3b7-extracodecs
libreoffice-style-breeze
lxqt-themes
meteo-qt-l10n
polkit-kde-1
python3-bs4
python3-musicbrainzngs
python3-soupsieve
qpdfview-djvu-plugin
qpdfview-ps-plugin
qpdfview-translations
sddm-theme-breeze
sddm-theme-debian-breeze
sddm-theme-elarun
sddm-theme-maldives
sddm-theme-maui
sddm-theme-maya
smplayer-l10n
smplayer-themes
xmms2-plugin-alsa
xmms2-plugin-id3v2
xmms2-plugin-mad
xmms2-plugin-vorbis
xscreensaver-data-extra
xscreensaver-gl
xscreensaver-gl-extra
The packages sddm-theme-breeze, sddm-theme-maldives, etc, give you some better options for the KDE desktop manager and login. SDDM = Simple Desktop Display Manager. Without one of these packages your login screen looks very bland. Almost as if it had been designed to put you off KDE. Maybe that is why you are encouraged to say no by having that option pre-chosen for you.
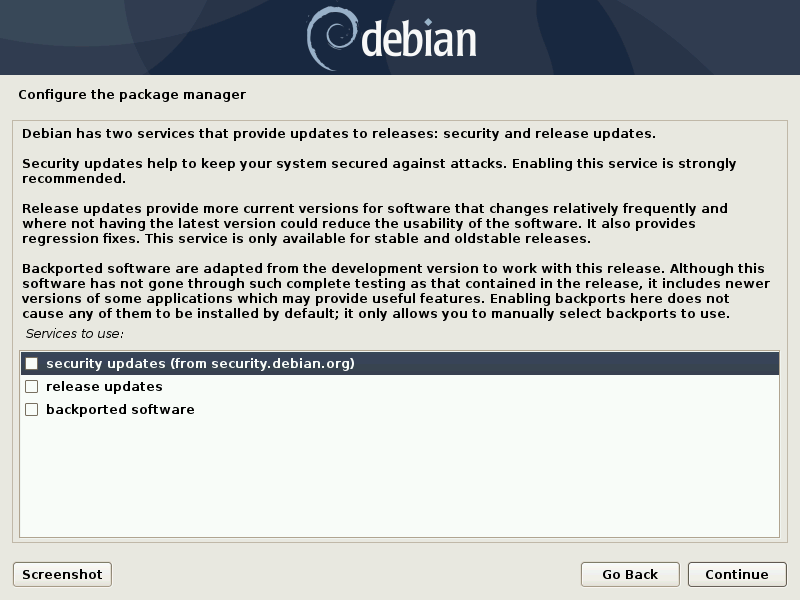
Leave the first two boxes ticked if you want the security and release updates to be automatically downloaded and installed (over the internet). I did not want this feature but somehow ended up with the package unattended-upgrades installed anyway, so I uninstalled it (with synaptic).
Debian uses a program called apt (Advanced Package Tool) to list available packages, and to manage the downloading and installing of them. It can even be used to upgrade your entire collection of packages. In order to do its work, it needs to know which collections of software (repositories) are of interest to you. This you tell it by adding various lines to the file
/etc/apt/sources.list
The following are some lines and what they are for.
If you installed from DVD then the packages in that repository are listed by a line like:
deb cdrom:[Debian GNU/Linux 10.2.0 _Buster_ - Official amd64 DVD Binary-1 20191116-09:57]/ buster contrib main
Because the DVD repository is listed first, the package manager apt will ask you for the DVD whenever you desire a package listed as being on the DVD, even though that package may also be included in other repositories listed later. If you prefer to download from the internet rather than find your DVD, you can comment out the "deb cdrom..." line.
If the package you want is not on the DVD, then it will be downloaded from one of the internet repositories that you list later in the sources.list file.
If you want security updates listed by apt you should add this line.
deb http://security.debian.org buster/updates main contrib non-free
Adding this line will only inform you of packages that have been updated when you reload your package information (with apt update). Updates will not be automatically installed unless you have the unattended-upgrades package installed.
In what follows you should replace http://deb.debian.org with a mirror close to you.
Of course, you will want the main listing of Debian Buster binaries, so add this line:
deb http://deb.debian.org/debian buster main contrib non-free
The following are also useful:
deb http://deb.debian.org/debian buster-updates main contrib non-free
deb http://deb.debian.org/debian buster-backports main contrib non-free
With these lines synaptic will list updates and backports. I would not have updates automatically installed, as updates have been known to break a working setup. If its not broken, don't fix it.
Backports are newer packages from Testing that have been checked to work with Buster.
According to some the following lines are a must:
deb http://www.deb-multimedia.org buster main non-free
deb http://www.deb-multimedia.org buster-backports main
I have been told that this repository includes a few multimedia programs not available from Debian, and also programs that are available from Debian, but with more features compiled in. It is not run by Debian, but the person who runs it, Christian Marillat, is apparently a Debian developer. You will need a deb-multimedia-keyring package. If your download speed is poor you can try one of the mirrors found at
https://www.deb-multimedia.org/debian-m
If you want your package manager to include source code packages, then add a line like
deb-src https://deb.debian.org/debian buster main contrib
If you don't compile your own programs, you won't need such.
After editing the /etc/apt/sources.list file you should update the system with the command:
apt update
This will reload the package information.
Generally, you will not use apt directly, but the graphical front-end for apt called synaptic.

Now you can select various software options.
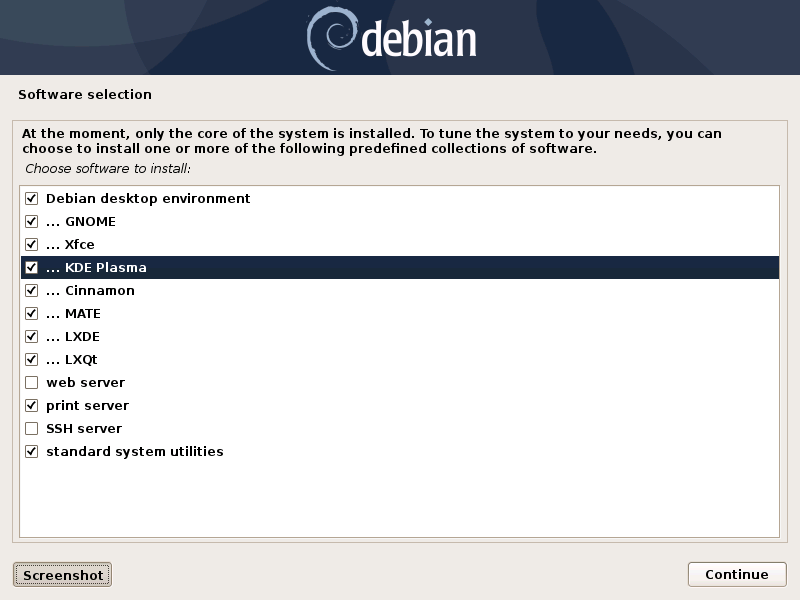
Choose all of the desktops (KDE Plasma, LXQt, LXDE, MATE, Cinnamon, Xfce, and Gnome) and compare them. If you only install KDE Plasma, then the package manager synaptic will not be available, and will have to be installed by hand. This is part of the general sabotage of KDE. This sabotage is not always subtle. As an example, the spacing used around italics in Konqueror is so bad that it can make a page difficult to read. This was not a problem with Konqueror in Debian 5. In many, many ways, KDE was better way back in Debian 5 (2009).
If you wish to run your own web-site with the Apache web-server. Choose "web server".
If you install the Gnome desktop, then the package gnome-user-share is included by default. When activated, this package enables file sharing over the internet. To do this the Apache web-server is run in the background. This is a very questionable practice. Web-servers are the favorite target of hackers, so faults in the server software may allow people to break into your system. The main problem is not that the Apache web-server is used, but that you are not told that you are running a web-server, and therefore you will not know that you need to be vigilant.
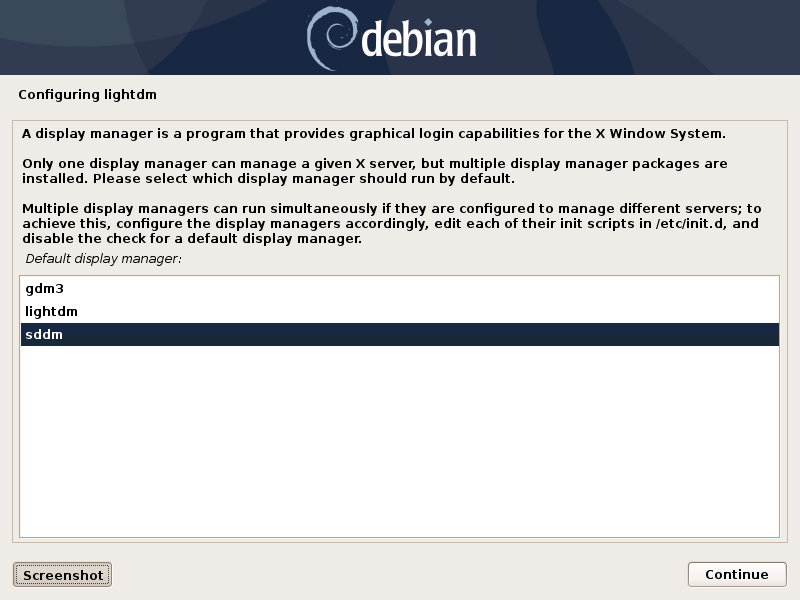
Choose either sddm or lightdm. Do NOT choose gdm3. At login, your desktop display manager should present a menu of the available desktops so that you change to the other environments. gdm3 does not do this. All you get is the Gnome desktop.
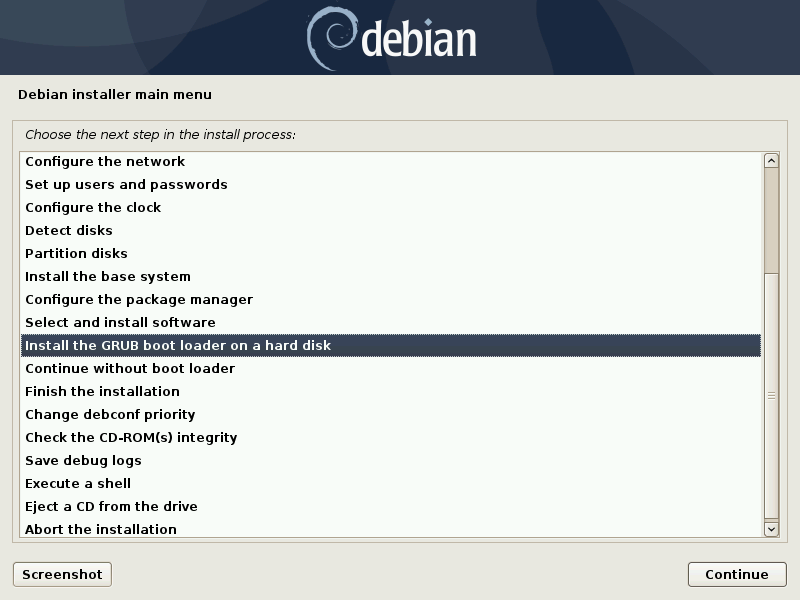
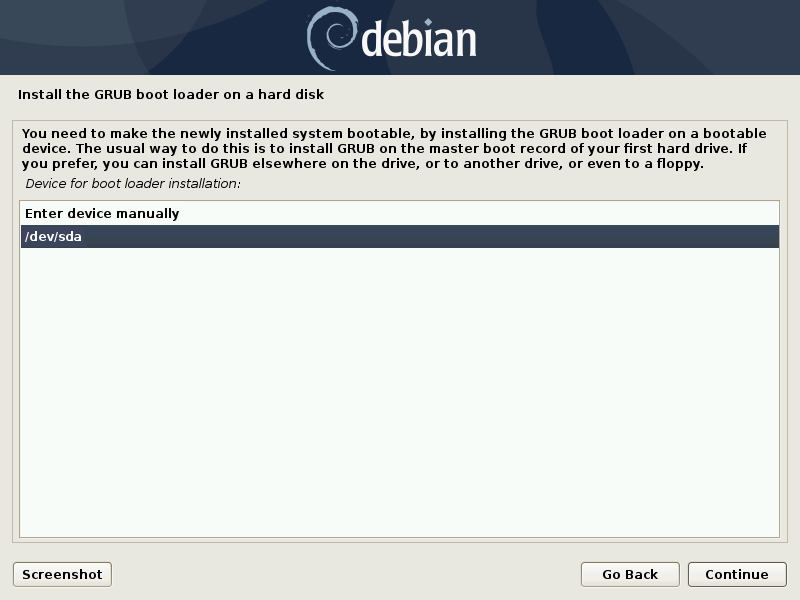
Grub is the program which boots your system.
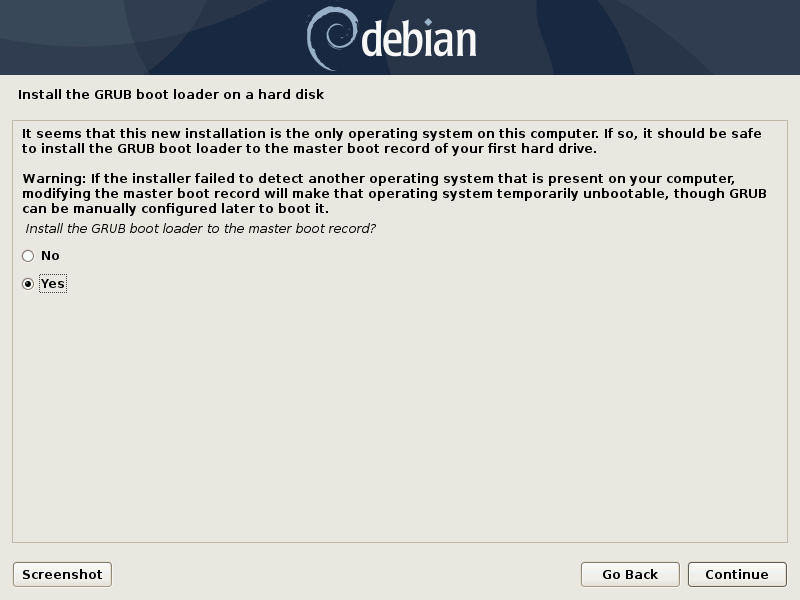
Apparently, Grub can be written to places other than the master boot record.

This is where the UEFI install failed for me. I think this page is saying that you will need a USB stick, or something, plugged into your computer to be able to boot Linux, which seems crazy. So, I clicked "No" and used the BIOS firmware. Apparently, using BIOS firmware makes it difficult to dual boot with Microsoft's "Windows 10" if that has been installed with EFI firmware. But with virtual machines, who cares about dual booting.
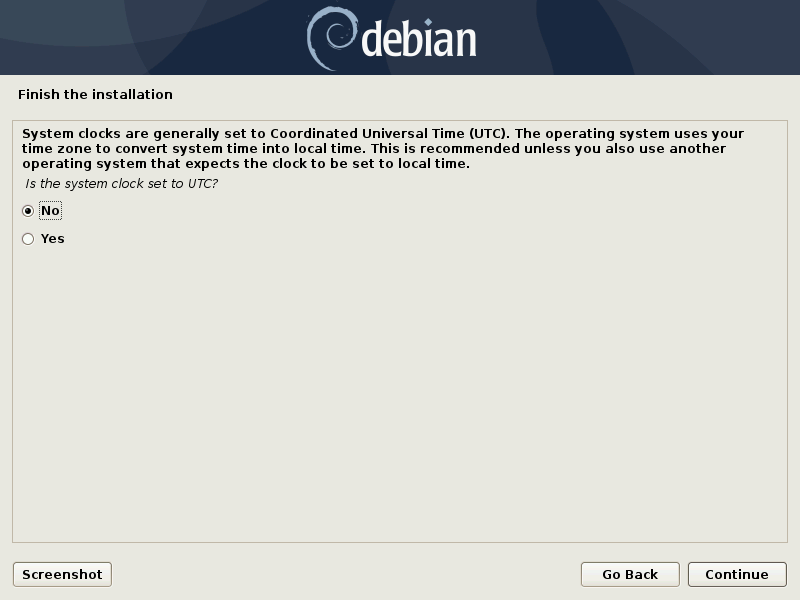
I wanted the system clock to be set the same as the hardware clock, which is possible, however, the software is set up to have the hardware clock set to UTC (Coordinated Universal Time).
As to adjusting the time system after installation, I am somewhat confused as to how the various ways of setting the time, and timezone, work. Both of the following commands
timedatectl
hwclock -v --show
show information on the time system, and both can be used to set it.
If you want the system clock to be the same as the hardware clock you create a file /etc/adjtime containing the three lines
0.000000 0 0.000000
0
LOCAL
However, the system complains that when the hardware clock is the same as the system clock there will be problems when it comes to daylight saving adjustments.
After rebooting I was presented with a black login screen much like the following.
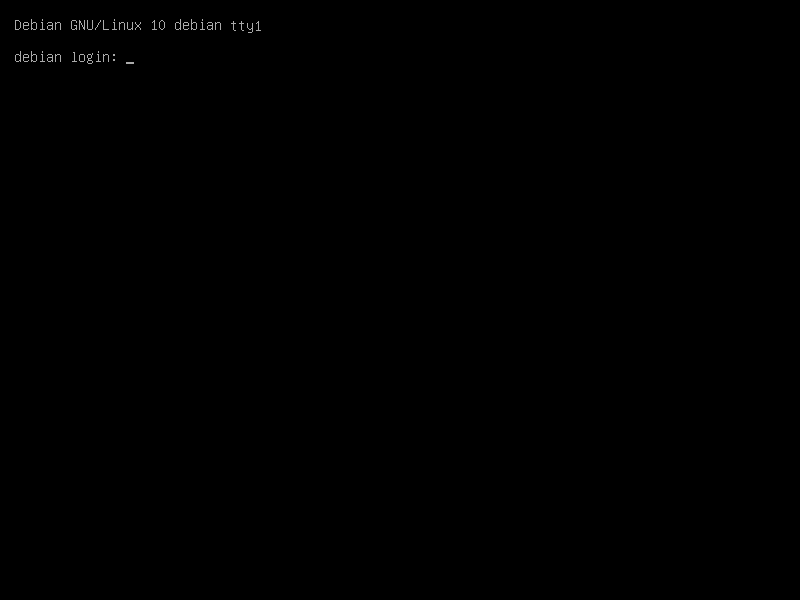
I was not particularly impressed, and it took some finding out what to do. First you log in as root. Then you grab the USB stick containing the firmware, and slot it into the computer. Now mount the USB stick on the directory /mnt. Change into that directory and list the contents. Choose the packages from the list that seem relevant, and install them with dpkg and reboot.
mount /dev/sdb1 /mnt
cd /mnt
ls | more
dpkg -i firmware-amd-graphics_20190114-2_all.deb /
........amd64-microcode_3.20181128.1_amd64.deb /
........firmware-realtek_20190114-2_all.deb
reboot
The " /" at the end of a line means that the command extends over the next line. This allows a command to be split over multiple lines.
Don't forget to change the .deb packets that I chose, for those you need. The NVIDIA binary drivers are hidden in the package
firmware-misc-nonfree_20190114-2_all.deb
If for some reason /dev/sdb1 is not your USB stick, enter the command, blkid, which lists the block devices of your computer, to determine its correct device name. If that doesn't work, then try the command fdisk -l. Remember, fdisk is a disk partitioner, so be careful how you use it. The option -l tells fdisk to list the devices it finds.
One of the nice things about the Linux console is the TAB completion of commands. For example, the command
dpkg -i firmware-amd-graphics_20190114-2_all.deb
can be entered by typing dp then pressing the TAB key which will complete dp to dpkg. Hitting TAB again will bring up a list of possible further completions. After typing dpkg -i f pressing the TAB key will complete to dpkg -i firmware, etc, etc. This TAB completion has been available on Linux for decades and has even been adopted by Microsoft's Powershell.
Another, nice feature is the use of the up and down arrow keys to scroll through commands you’ve recently used. You can also use Emacs? editing commands to edit the command line. At this point I should mention that emacs is by far the easiest editor to use in Linux. For common editing tasks emacs is very simple to use, although it would take a lifetime to learn all it's ins and outs. I strongly recommend it. You can install it from synaptic, or with the command
apt-get install emacs-gtk
The Linux feature I like the most, is that when any text is selected with the mouse, or by double clicking, it is automatically copied. That's it, nothing more, no need to press Ctr-C. To paste the text you just click the middle mouse button where you want the text to appear, no need for Ctr-V. Getting rid of these totally unecessary key-strokes is like a breath of cool air on a hot day. Linux has been this way for decades. Unfortunately, however, various unaware Linux programmers are trying to introduce the Ctr-C/Ctr-V mess, even though Linux doesn't need, or want, it.
I was told that the partitioning software used by the installer was parted but on trying the program parted I found it was quite difficult to use. In particular, partition alignment was a big problem. This was an entirely different piece of software. One that I could not recommend.
After rebooting I had a rather bland graphical login screen (due to installing without the internet). I choose the KDE Plasma desktop from the desktop menu, then logged in. I saw the expected menu button and panel and set about exploring. First I found synaptic in the menu and opened it. I browsed through some of the packages listed, but there were too many. Then I explored other programs found in the menu. Gimp, Linux's version of Photoshop, seemed like a nice piece of software as did the LibreOffice suit, Linux's version of Microsoft Office. Later, I was to learn that Gimp has hardly changed from Debian 5, and has, in some ways, got worse. In fact, many programs in Debian 10 KDE have changed little since Debian 5, or got worse. Konqueror being a prime example.
A couple of very annoying "features" of the KDE desktop are the yellow note's page that turns up occasionally (when you middle click on the desktop) and the so-called "desktop toolbox", both of which are difficult to get rid of, unless you know how. The desktop toolbox is the small icon with the triple bar of the panel, and the word Default to it's right. To get rid of the note's page; Right-click on the Desktop > Configure Desktop > Mouse Actions. Then delete the line "Middle-Button Paste" by clicking on the Minus sign at the end of the line, and clicking OK. To get rid of the desktop toolbox; Right-click on the Desktop > Configure Desktop > Tweaks. Then click off "Show the desktop tool" and click OK. To make discovering how to turn off these annoying "features" more difficult, desktop configuration has been moved from "System Settings" to its own little corner. Death by a thousand cuts.
I opened KDE's Konsole from the menu, entered su to change to the root user, and tried to add a new user, only to be told that the relevant command adduser was not found. In fact, all root level commands were nowhere to be found. I tracked this problem down to the root users PATH having been "accidently" set incorrectly. For a temporary fix you can issue the command
PATH=/usr/local/sbin:/usr/sbin:/sbin:$PATH
For a permanent fix you can add this line to root's .bashrc file. Later I read that su - also works. Another little bit of sabotage to make Linux harder to use. Death by a thousand cuts.
Having written the Debian 10 ISO image to DVD, I unwisely deleted it. However, one can retrieve the ISO image from the DVD with the command
dd if=/dev/sr0 of=debian-10.2.0-amd64-DVD-1.iso
Be very careful with the program dd. At least read the manual page which is found with
man dd
You can also install Debian 10 from a 8GB USB stick. You copy the ISO image to the stick, with
cp debian-10.2.0-amd64-DVD-1.iso /dev/sdb
sync
Don't forget the sync. Of course this will destroy any data you had on the USB stick. And you need to be very sure that the device /dev/sdb is in fact your USB stick. The reported size usually makes this obvious. I am not sure what would happen if /dev/sdb was your second hard-drive. If the cp program allowed anything to happen at all, I would guess that you would lose all the data on that drive. Note that you are not copying the ISO image to a partition of the USB stick (which would be something like /dev/sdb1) but to the device itself (which is /dev/sdb with no number). Here, cp is just Linux's usual copy program.
After preparing the USB stick you enter the BIOS and make sure that your computer boots first from the USB stick, then from the hard-drive. From there the installation is the same as above.
Further information on the installation can be found on the DVD itself. Mount the DVD on /mnt with the command
mount debian-10.2.0-amd64-DVD-1.iso /mnt
Then it can be found at /mnt/doc/manual/en/index.html
Virt-manager & Virtual Machines.
But my goal was to investigate virtual machines, so I needed to install virt-manager, libvirt, and qemu. Installing virt-manager pulled in the other two as dependencies. I used synaptic to do this. The apt-get command used by synaptic would have been
apt-get install virt-manager
This pulled in (also installed) the following packages;
libxenforeignmemory1
libxencall1
seabios
liblvm2cmd2.03
libgovirt2
libaugeas0
python-openssl
virtinst
python3-distutils
ipxe-qemu
gir1.2-spiceclientgtk-3.0
libibverbs1
python-requests
libvdeplug2
libdevmapper-event1.02.1
augeas-lenses
ibverbs-providers
qemu-system-x86
python3-libxml2
dmeventd
lvm2
python-certifi
libnetcf1
libvirt-clients
librdmacm1
libspice-server1
python-enum34
libgovirt-common
libxentoollog1
ovmf
libvirglrenderer0
python-cryptography
libxentoolcore1
python-cffi-backend
python-ipaddress
libxenstore3.0
libxendevicemodel1
qemu-system-data
qemu-utils
libvirt-daemon-system
gir1.2-gtk-vnc-2.0
python-urllib3
python3-lib2to3
virt-manager
virt-viewer
libvirt-glib-1.0-0
qemu-kvm
libvirt0
libfdt1
python3-libvirt
libcapstone3
python-idna
libxenevtchn1
netcat-openbsd
gir1.2-libvirt-glib-1.0
libxengnttab1
thin-provisioning-tools
gir1.2-libosinfo-1.0
qemu-system-common
gir1.2-spiceclientglib-2.0
python-asn1crypto
qemu-system-gui
libxenmisc4.11
libvirt-daemon.
Notice that qemu is qemu-system-x86 (which includes the program qemu-system-x86_64).
Being desperate to try out virt-manager I fired it up with the command:
virt-manager
Virt-manager asked for the root password and would clearly run the virtual machine as the root user. I had been told that running a GUI application as the root user was a security risk, but ran it anyway. Of course, I installed Debian 10. Virt-manager has a default configuration for the virtual machine that will run a particular operating system. I chose the Debian 10 default.
After this I tried to find out how to run virtual machines as an ordinary user. This was surprisingly difficult to discover. One internet article said that you had to uncomment (remove the initial # sign) from the following lines
#unix_sock_ro_perms = "0777"
#unix_sock_rw_perms = "0770"
#unix_sock_admin_perms = "0700"
of the file /etc/libvirt/libvirtd.conf. This I did. Later I changed the last line to
unix_sock_admin_perms = "0770"
At this point I am unsure how much of this was necessary. To register the changes I then restarted the libvirt daemon with
service libvirtd restart
but still couldn't run virt-manager as an ordinary user. I rechecked the group permissions, still no luck. Eventually, I found that this can be done with the command:
virt-manager --connect=qemu:///session
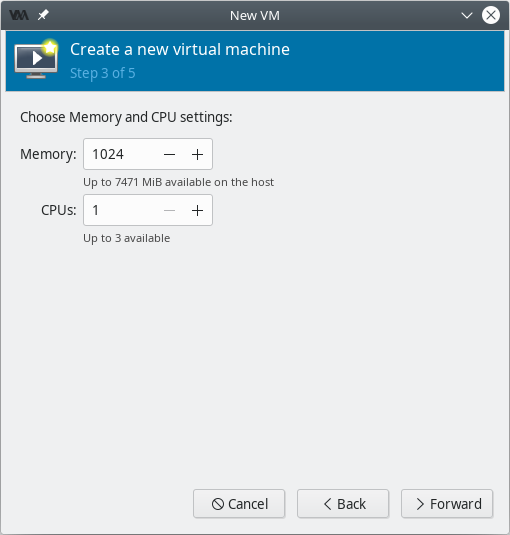
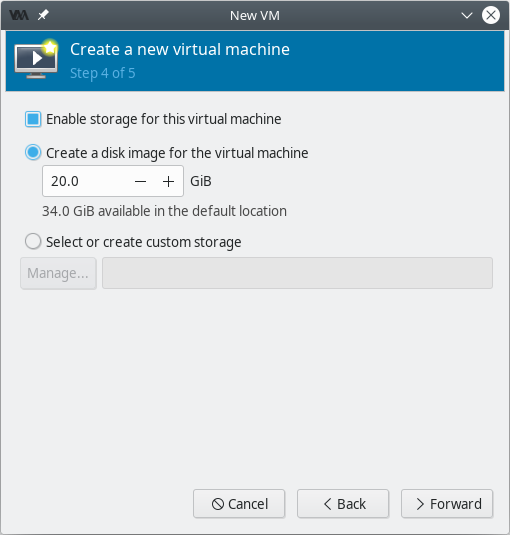
We will now create a virtual machine called, debian10, running under Debian 10.
To begin the process choose File > New Virtual Machine or click on the leftmost icon.
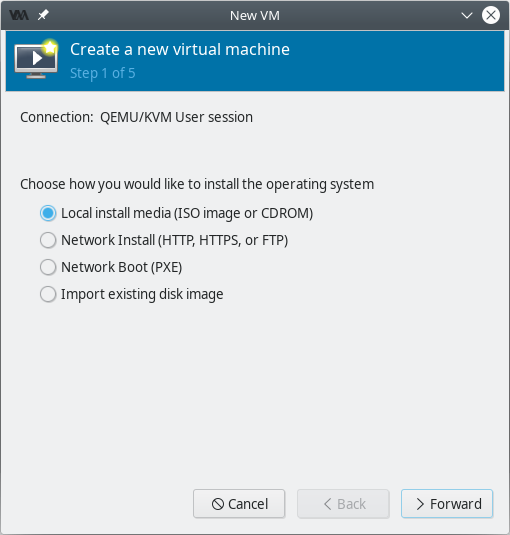
Click Forward.

Click on the Browse button, and navigate to the Debian 10 ISO image. Virt-manager detects Debian 10 as the operating system being installed. When I installed Debian 5, virt-manager did not detect the operating system. In this case, click off automatic detection. Type a. Choose "End of life operating systems". Then choose "Debian Lenny". Or choose "Generic default".
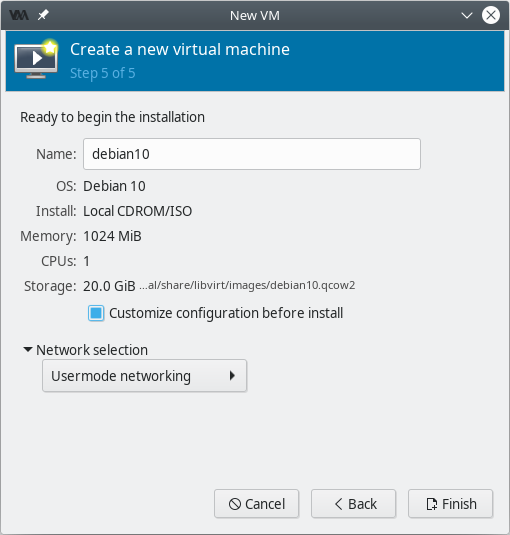
Click Customize configuration before install.
User-mode networking is good. In this case the guest thinks it is physically connected to a completely fake LAN (Local Area Network). The virtualization code emulates a DHCP server and gateway router, a DNS server, and a SMB server (if the guest is a Windows system and Samba is installed on the host). The guest has default IP-address; 10.0.2.15, the DHCP server; 10.0.2.2, the DNS server; 10.0.2.3, and the SMB server; 10.0.2.4. The fake nature of the LAN means that you cannot add extra network cards. The code is written so that the LAN behaves as if it was behind a firewall which blocks all incoming connections. Of course, the host's network card sends and receives the actual packets (using a NAT like setup).
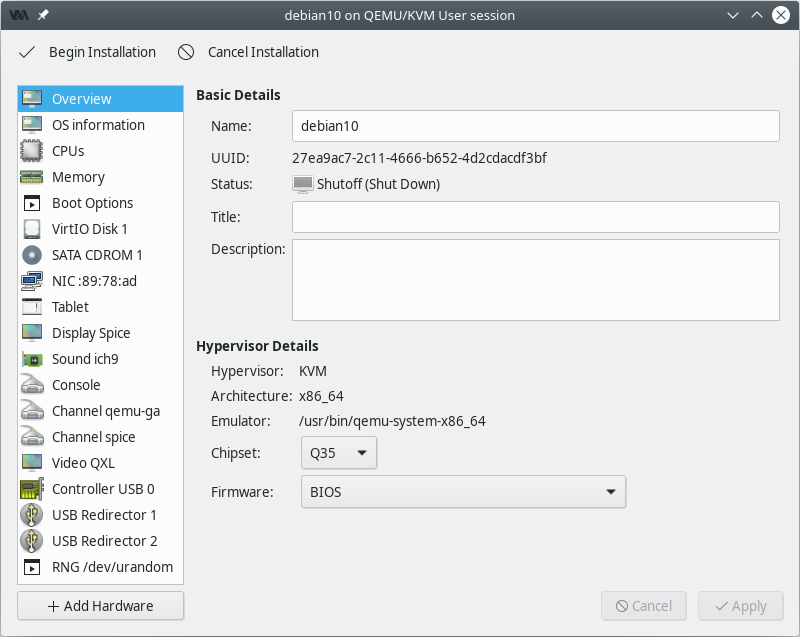
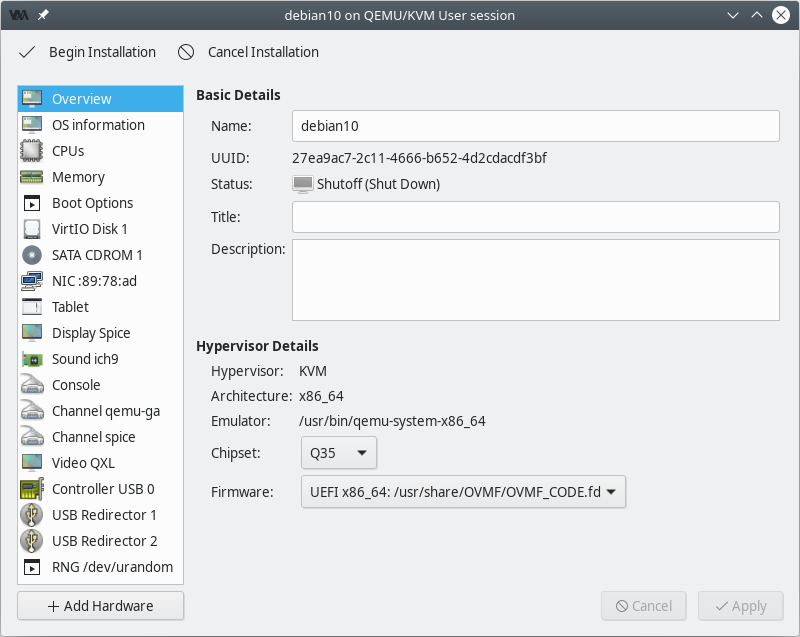
Here you can change your BIOS firmware for UEFI firmware.
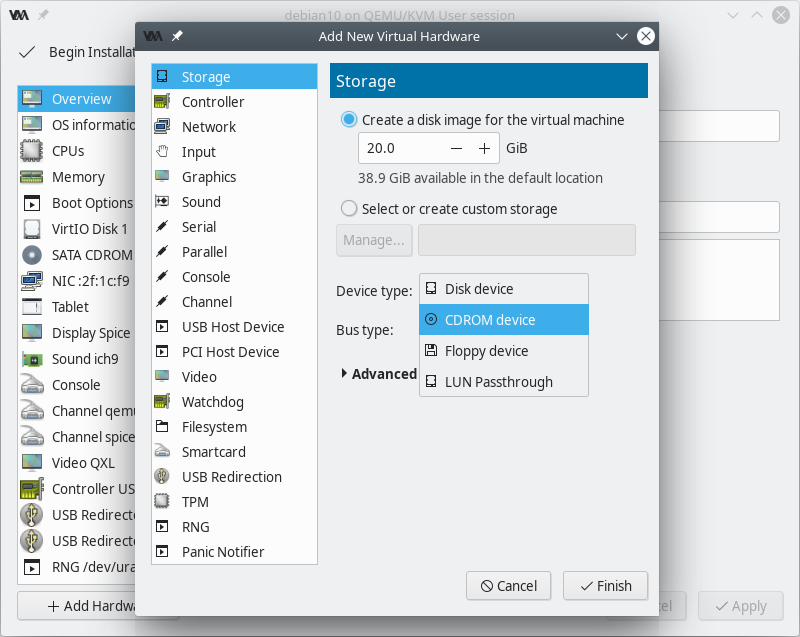
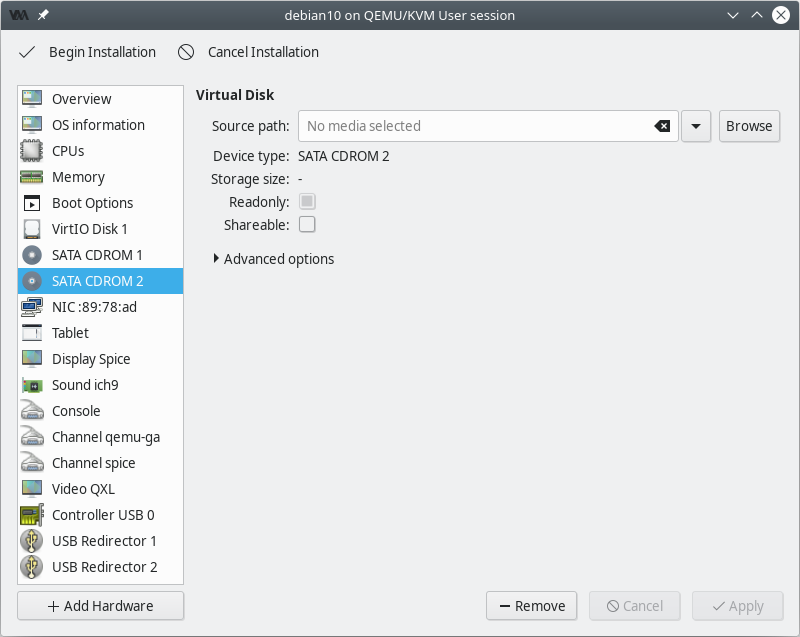
Or by clicking Add Hardware add a second CDROM.
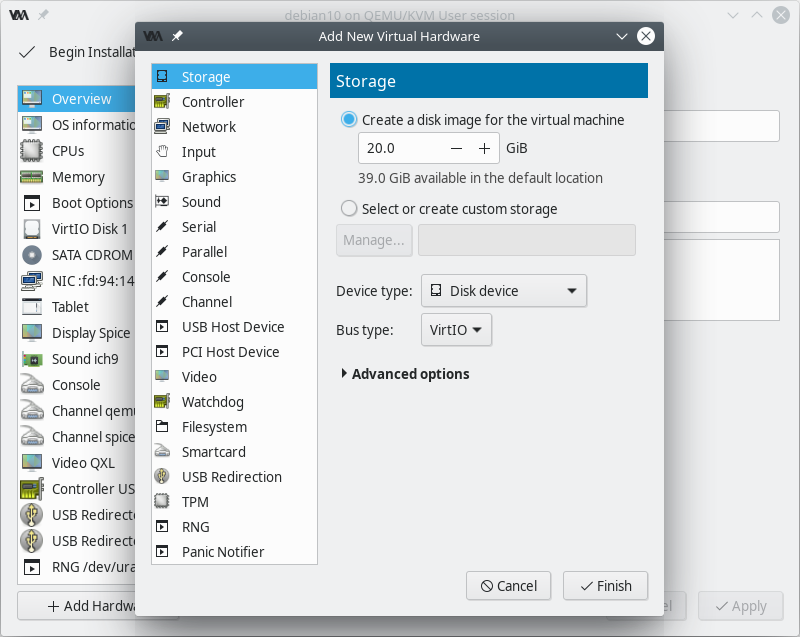
This might be useful if you wish to install from two DVDs.
And if you wish to remove the second CDROM, just click on it, and click Remove.
When you are ready, click the Begin Installation button and install Debian 10.2.0. You do this in the same way as you installed it on your real machine.
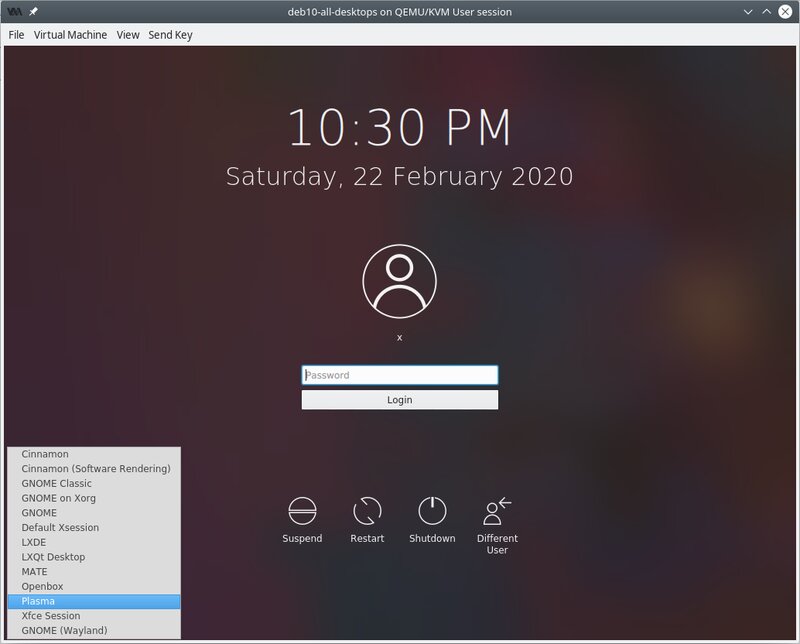
After the installation I installed the sddm-theme-breeze package to get the "Breeze" login screen pictured above. Notice the sddm menu that allows you to easily change desktops. Notice also that even though this is KDE's desktop manager, the option for KDE Plasma is toward the bottom of the list and without reference to KDE, and that the (not so great) Gnome desktop features four times. Death by a thousand cuts.
In virt-viewer you can choose View > Full screen for full screen. To get out of full screen mode search for the popup dialogue at the center of the top of the screen.
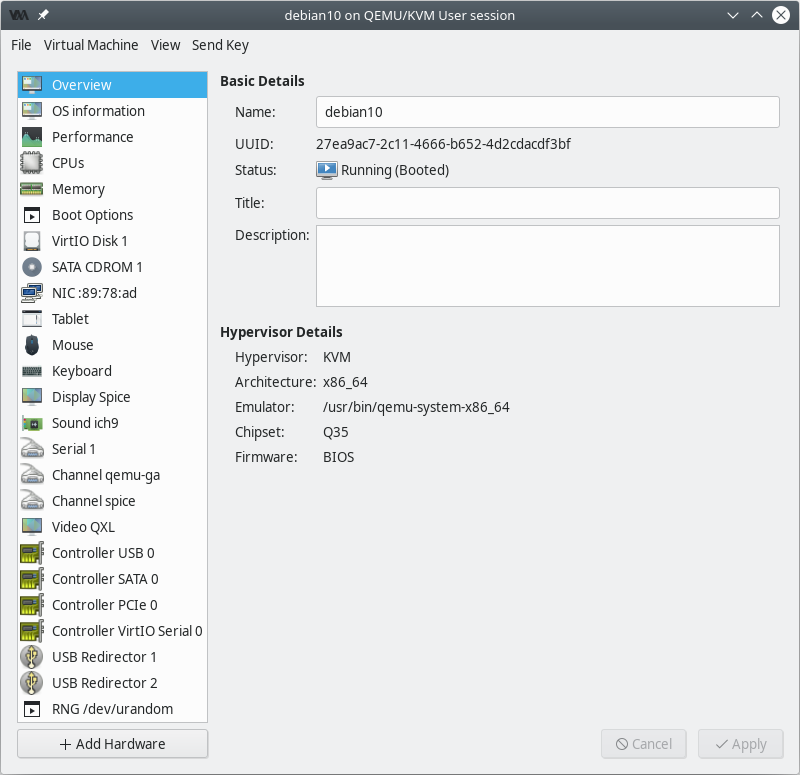
When booted the virtual machine shows a few extra bits of hardware.
Both the internet (user-mode networking) and audio work out of the box.
Virt-manager is actually a GUI for qemu. It puts together complex qemu commands. For example the command that runs the virtual machine debian10 begins with
/usr/bin/qemu-system-x86_64 -name guest=debian10,...
and runs for 3253 characters. While the VM is running you can see the full command line with:
ps auxww | grep qemu
I wanted to copy files between my computer (the host) and the virtual machine debian10 (the guest). There are a number of ways of doing this. I chose to mount the guest image as a network block device. This has the disadvantage that the virtual machine cannot be running while you copy the files. But it works well. You need the package qemu-utils.
apt-get install qemu-utils
If you have been following this page, then you will find that qemu-utils is already installed. You need to load the nbd kernel module (this is why you choose the generic initrd) with
modprobe nbd
ls /dev/nbd*
lsmod | grep nbd
The second command simply lists the NBDs created. NBD stands for "Network Block Device". The third command checks to see if nbd is among the loaded kernel modules. The following command connects the image debian10.qcow2 to the NBD /dev/nbd0.
qemu-nbd -c /dev/nbd0 /path/to/the/file/debian10.qcow2
Virt-manager stores your images in ~/.local/share/libvirt/images/. The device /dev/nbd0 will now contain the virtual machine image as a block device and any partitions of the virtual image will be available for mounting. You can list them with
fdisk -l /dev/nbd0
Let's mount the first partition on /mnt with
mount /dev/nbd0p1 /mnt
ls /mnt/
Now you have read/write access to the first partition of debian10.qcow2. The second command simply demonstrates that the image is really available under /mnt. Now you can copy files to and from the guest with ease. Remember, you cannot run the guest while it is mounted and you cannot mount it while it is running. These can be very bad for the health of the guest, so there is a lock file to prevent it. To reverse the process use
umount /mnt
qemu-nbd -d /dev/nbd0
Note that the un-mount command is umount (no n).
I had been told that very old versions of KDE were actually better than recent versions. To check this, I downloaded the installation DVD for Debian 5.0.0 (a distribution from 2009) and installed it on a virtual machine. Later, I tried to install it on my physical machine but couldn't because its old kernel had no drivers for SATA devices.
Internet (user-mode networking) and audio also worked out of the box for Debian 5.
With debian5.qcow2 mounted under /mnt, as above, I wanted to chroot to /mnt and run programs from Debian 5. However, when I ran the command
chroot /mnt /bin/bash
All I got was: Segmentation fault.
Oh, wonderful. Fortunately, I was told the cause of the problem. It seems that some Debian developer decided to cripple chroot by turning off a kernel option that it relies on. The pretext for this (needed for plausible deniability) was not very convincing. You can see the relevant option is not set by checking the configuration file of the kernel:
grep VSYSCALL_EMULATE /boot/config-4.19.0-6-amd64
# CONFIG_LEGACY_VSYSCALL_EMULATE is not set
To fix this, add vsyscall=emulate to the GRUB_CMDLINE_LINUX_DEFAULT variable.
This variable is found in the file /etc/default/grub. In my case the line became:
GRUB_CMDLINE_LINUX_DEFAULT="quiet vsyscall=emulate"
Now you need to tell GRUB about the change, and reboot
update-grub
reboot
cat /proc/cmdline
If the output of the last command includes vsyscall=emulate you are good to go. Another fix is to compile a new kernel with the option turned on. I was also told that chroot has been the subject of much sabotage over the years and that most Linux flavors have suffered this sabotage.
I have been asked to say a little about the setting up of a chroot environment. First fix the kernel sabotage. Then bind certain important directories so that they appear in two places and mount the proc filesystem.
mount -o rbind /tmp /mnt/tmp
mount -o rbind /dev /mnt/dev
mount -o rbind /sys /mnt/sys
mount -o rbind /run /mnt/run
mount -t proc none /mnt/proc
The following commands allow for clean and easy unmounting
mount --make-rslave /mnt/dev
mount --make-rslave /mnt/sys
mount --make-rslave /mnt/run
I have a directory /a (actually a mounted partition) that serves as a shared directory for all the chroots I am running. Of course, for this to work you need to create an empty directory /a in each chroot environment. Mount it with
mount -o rbind /a /mnt/a
If you want to use your DVD you need
mount -o rbind /media/cdrom /mnt/media/cdrom
And you will need permission to use the X-server to run GUI-programs.
xhost local:localhost
Now everything is ready and you can chroot into the new environment.
chroot /mnt /bin/bash
After chrooting into the Debian 5 environment you should become an ordinary user in order to run all the Debian 5 programs.
su john
Now start up Debian 5's panel and menu button with
kicker &
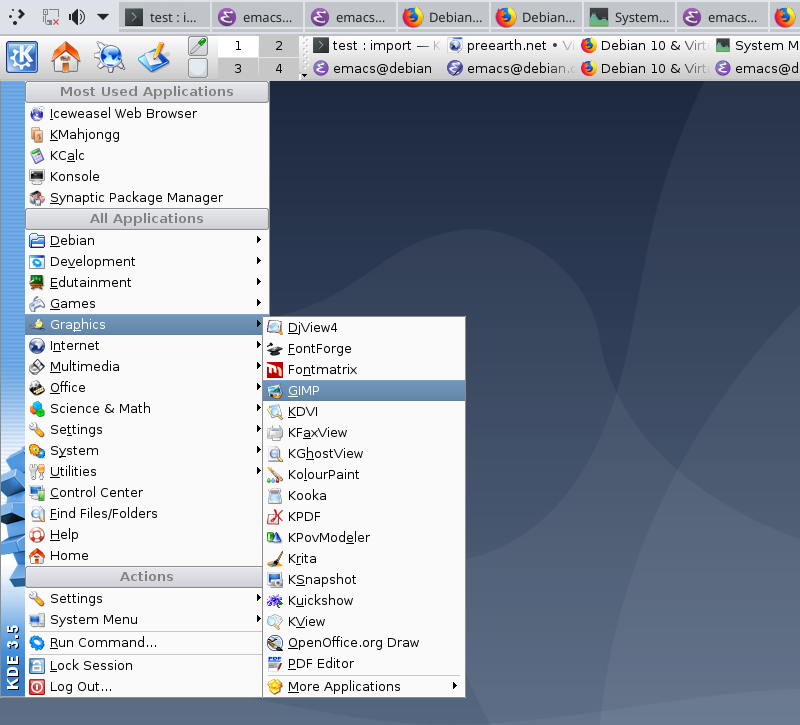
I arranged Debian 10's panel at the top of the screen with Debian 5's panel directly below it. After a while I realised that Debian 5's panel was easier to use, and now use it for all panel operations except accessing Debian 10 programs. Debian 10's panel has basically been reduced to a holder of the Debian 10 menu button. I disabled Debian 10's clipboard, which is useless, and now only use Debian 5's clipboard, which is a hundred times better. And, just as I had been told, I have found that Debian 5's GIMP is much easier to use. The following image shows the top left corner of my screen with both Debian 10, and Debian 5 running, and the Debian 5 menu open.
When you have finished with the chroot environment, leave with
exit
which will take you back to being the root user, then
exit
again. This will take you out of the chroot environment. Then unmount everything.
umount -R /mnt/a /mnt/media/cdrom0 /mnt/proc /mnt/dev /mnt/sys /mnt/run
Before finding out how to unmount everything cleanly, I used to simply log out. This didn't seem to cause any problems.
I have downloaded Debian 8. So far, I like it less than both Debian 5 and Debian 10.
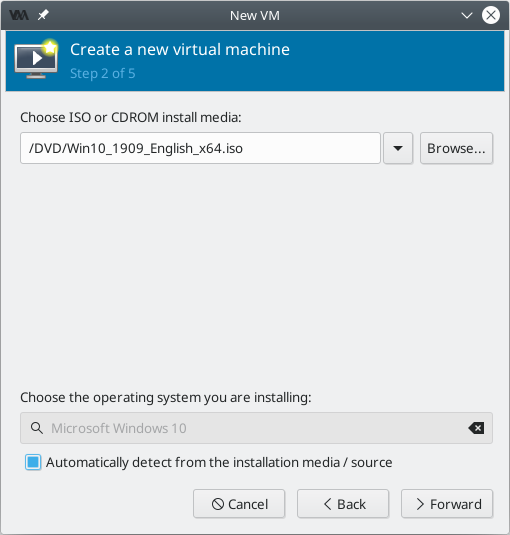
Moving on, let's install Windows 10 on a virtual machine. If you have a Windows 10 installation disc use that. If not you can download Win10_1909_English_x64.iso from
https://www.microsoft.com/en-us/software-download/windows10ISO
Fire up virt-manager with
virt-manager --connect=qemu:///session
Now, do as you did for the Debian 10 install except use the Windows 10 ISO, and make sure that Windows 10 is detected as the operating system you are installing. Telling virt-manager the operating system enables things to be tailored to it. However, by comparing the Windows 10 hardware with the Debian 10 hardware, it also appears to cause certain channels to be missing.
Choose Customize configuration before install and add the missing channels.
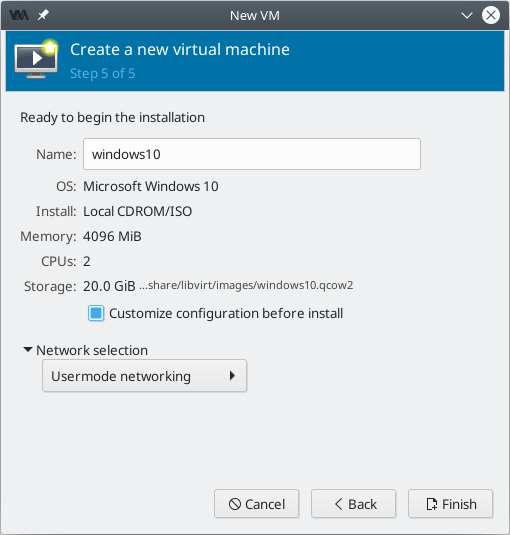
Click Finish.
Click Add Hardware > Channel.
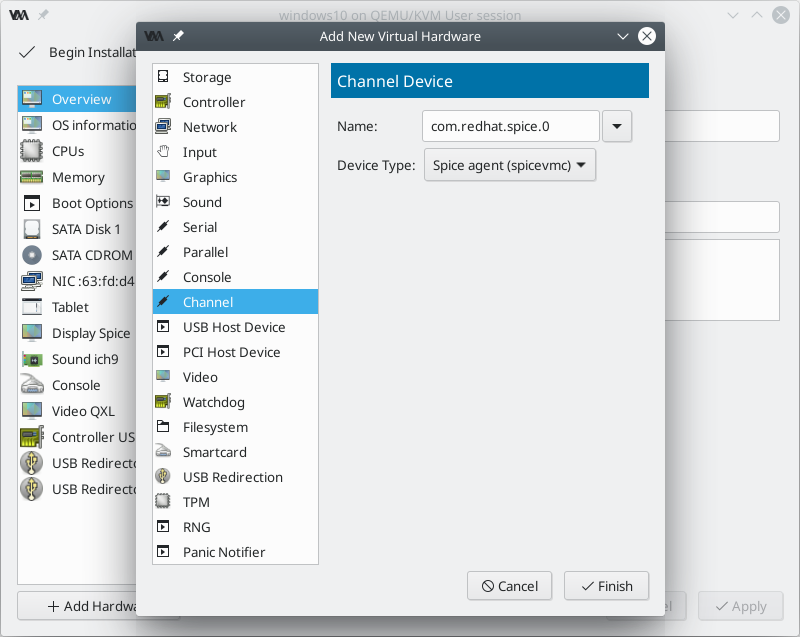
Click Finish.
Click Add Hardware > Channel.
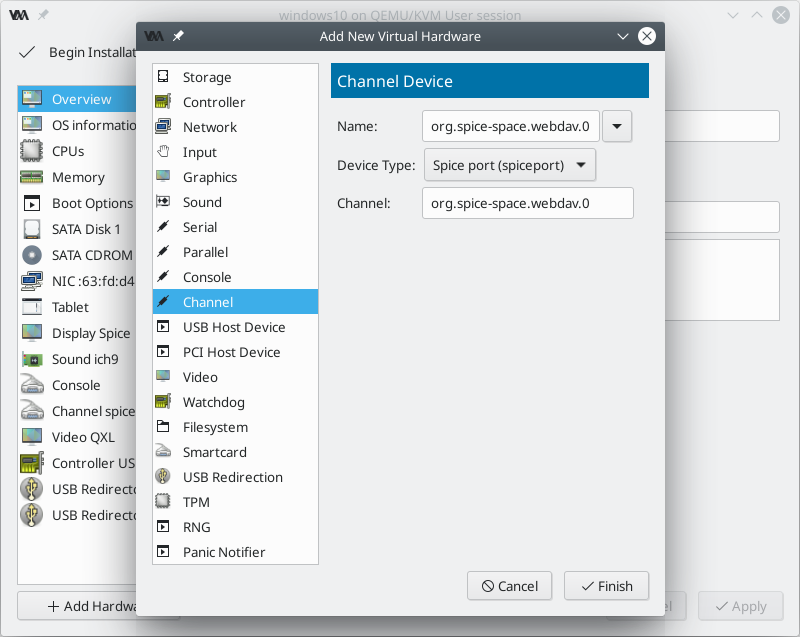
Click Finish.
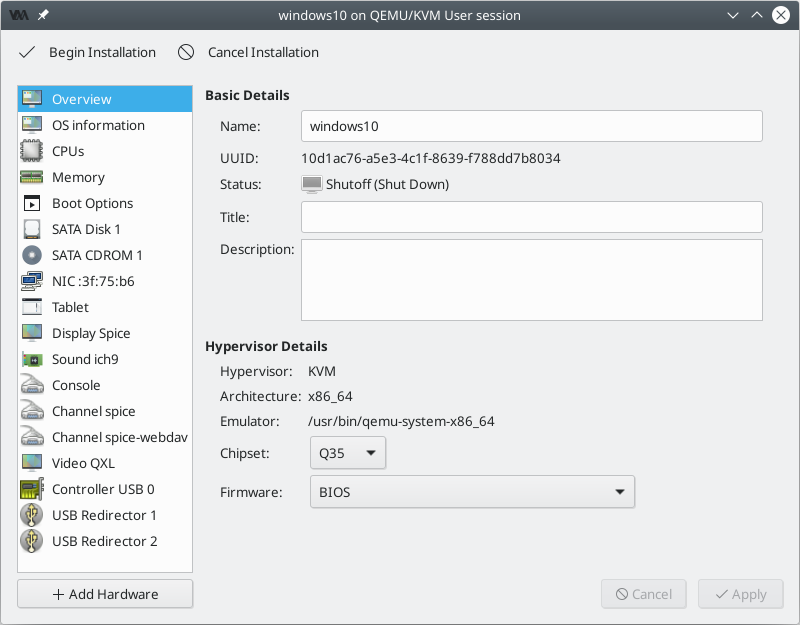
Click Begin Installation.
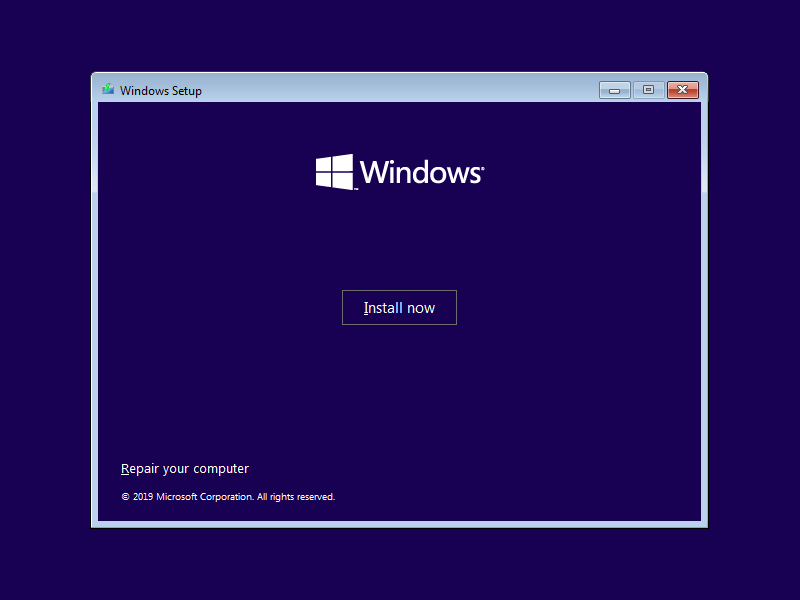
The Windows 10 installation is fairly straightforward.
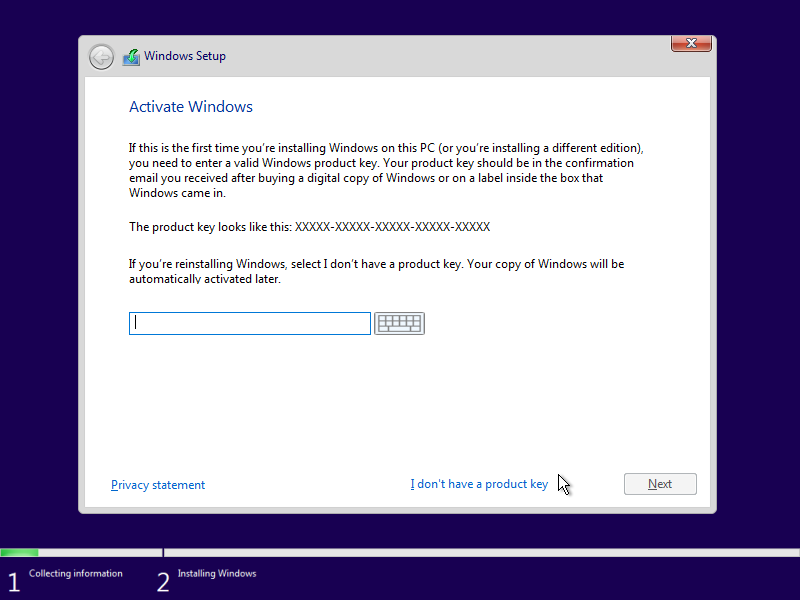
If you don't have a product key, click I don't have a product key.
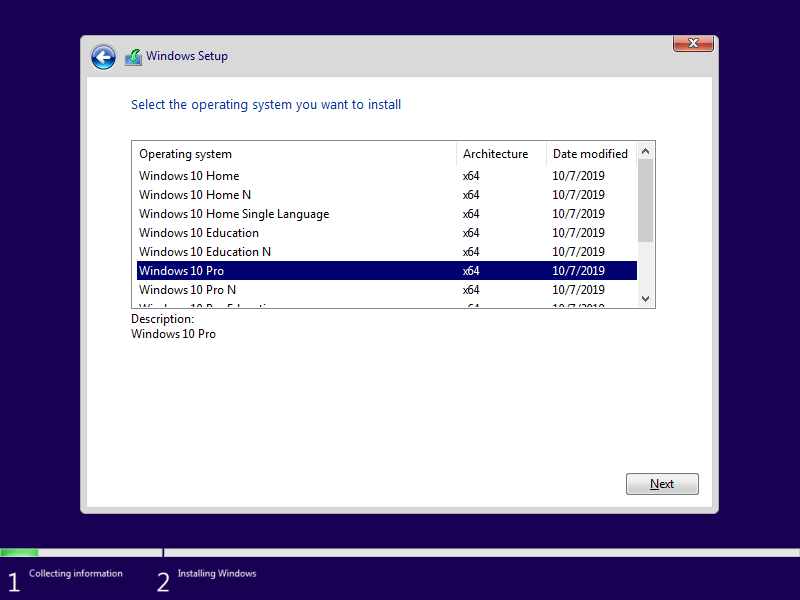
May as well choose the best.
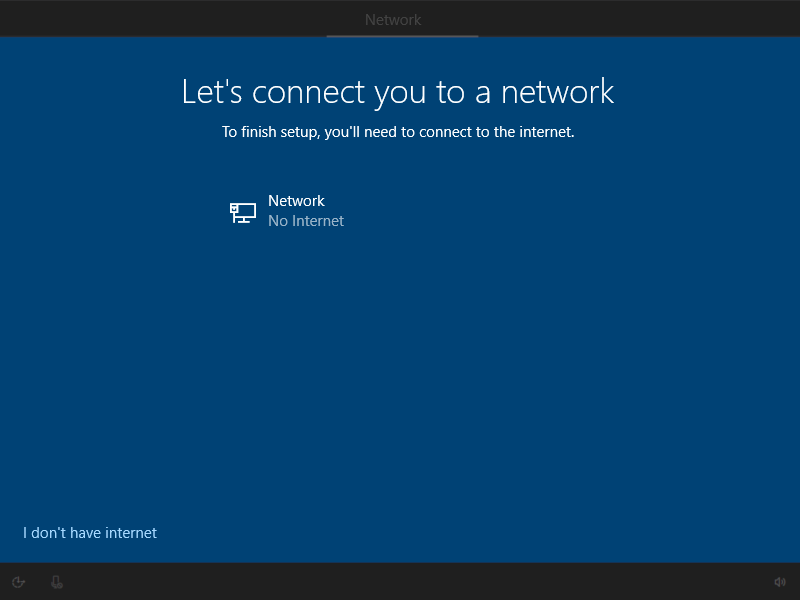
You will have to decline options involving the internet.
And eventually,...
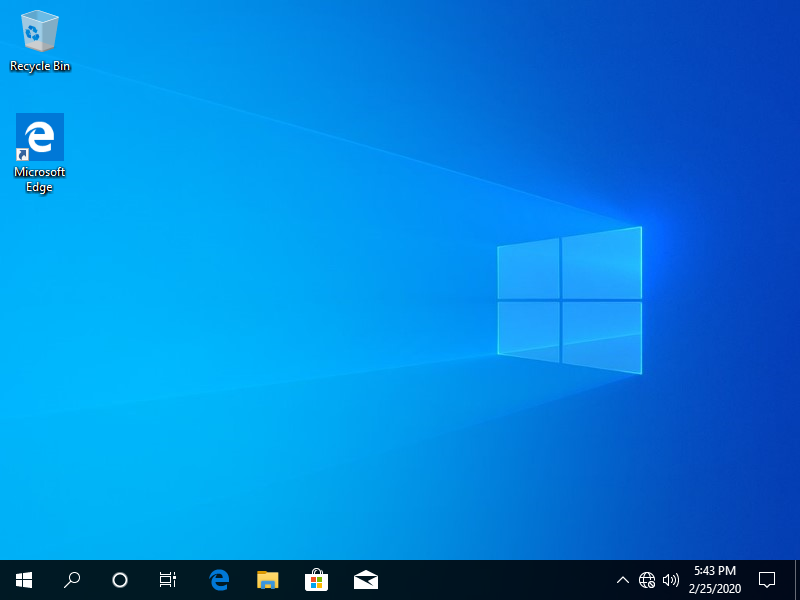
At this point, both the internet (user-mode networking) and audio work.
You will probably want to adjust the screen resolution by right-clicking on the desktop > Display settings > Display resolution. You should also turn off automatic upgrades.
Type services.msc in the textbox and press Enter. It'll open Services Manager.
Scroll down to bottom and you'll see a service "Windows Update" in the list.
Double-click on the service and change its Startup type to Disabled.
This will be enough for many users but you can also add a shared clipboard, and a shared directory. In doing this you also get dynamic resolution, and a few drivers that are especially tailored to virtual machines.
Till this point, the graphics connection to the virtual machine has been handled by the version of virt-viewer bundled with virt-manager. This is the connection (window) you get when you click on "Open" in virt-manager. The ability to establish a shared directory is not compiled into the bundled version. So, if you want a shared directory you will always have to use the non-bundled version. Clipboard sharing works with both versions.
So, let's establish our shared clipboard and directory.
First, shut down windows10.
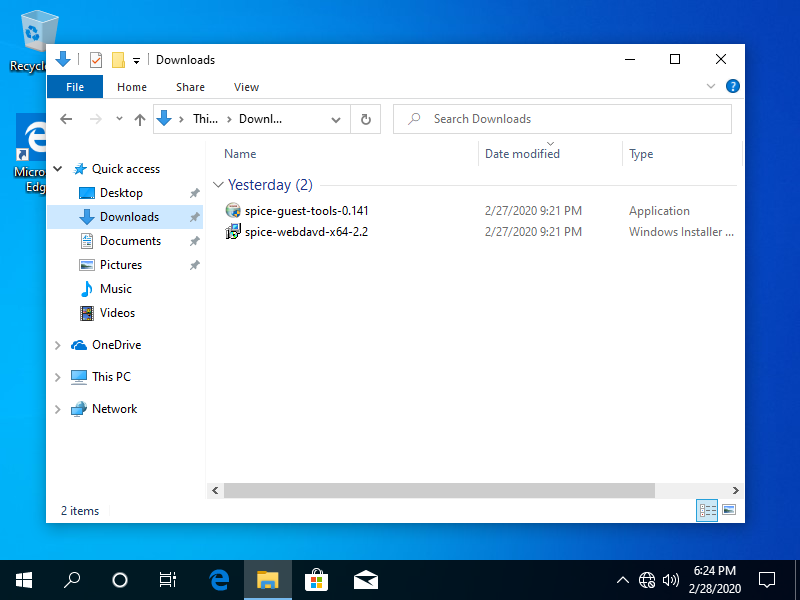
Download the following two files from https://www.spice-space.org/
https://www.spice-space.org/download/windows/spice-guest-tools/spice-guest-tools-0.141/spice-guest-tools-0.141.exe
https://www.spice-space.org/download/windows/spice-webdavd/spice-webdavd-x64-2.2.msi
Check that your system has ntfs-3g installed. It provides support for the NTFS filesystem.
modprobe nbd
qemu-nbd -c /dev/nbd0 /path/to/the/file/windows10.qcow2
mount /dev/nbd0p2 /mnt
Notice the second partition has been mounted. The first partition is the EFI system partition.
cp spice-guest-tools-0.141.exe /mnt/Users/John/Downloads/
cp spice-webdavd-x64-2.2.msi /mnt/Users/John/Downloads/
The guest has a user called John.
umount /mnt
qemu-nbd -d /dev/nbd0
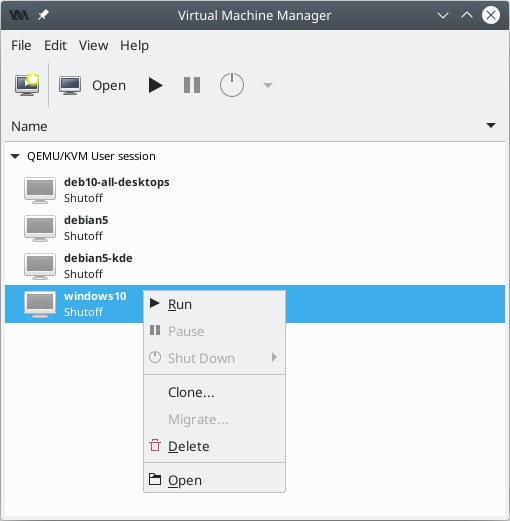
Open virt-manager with
virt-manager --connect=qemu:///session
Right click on the "windows10" entry and choose "Run".
Now fire up the non-bundled version of virt-viewer with
virt-viewer --connect=qemu:///session --domain-name windows10 &
This will establish a graphical connection with the virtual machine "windows10". When it has finished booting, navigate to John's downloads directory
Double click on "spice-guest-tools-0.141" and install the Spice guest tools.
Double click on "spice-webdavd-x64-2.2" and install the Spice WebDAV daemon.
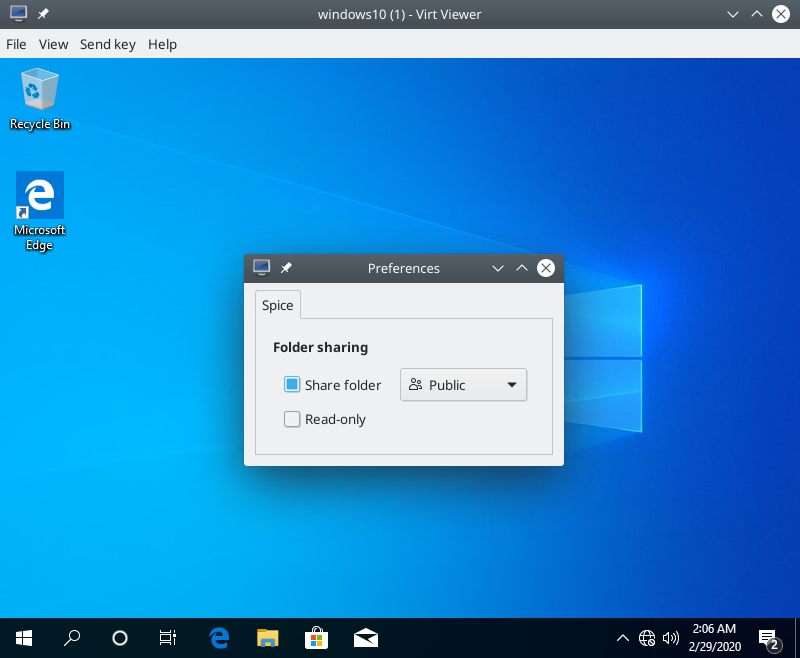
Now choose File > Preferences
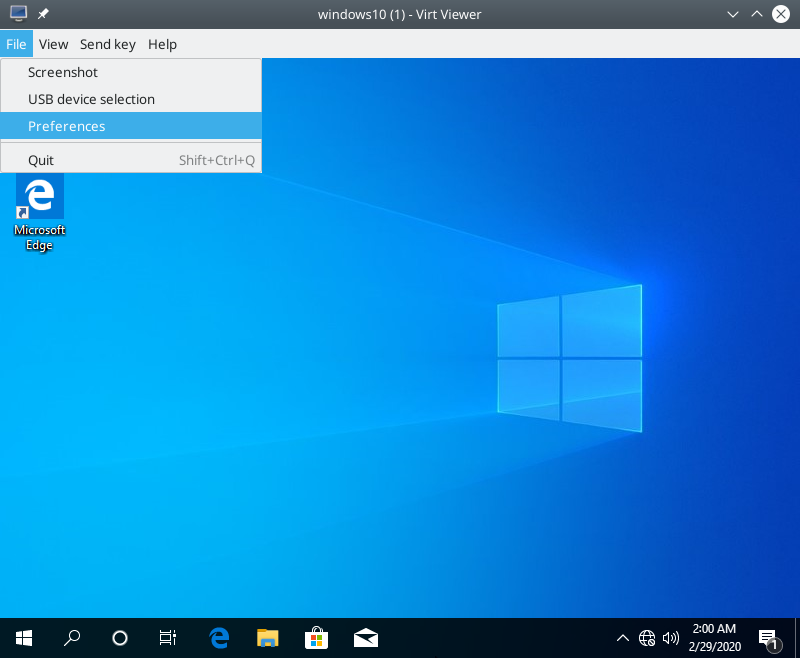
Choose the directory you wish to share.

Click the "Share" button and then close the dialog.
Now you have to Reboot.
Once windows10 has rebooted open "File Explorer" to the folder "This PC".
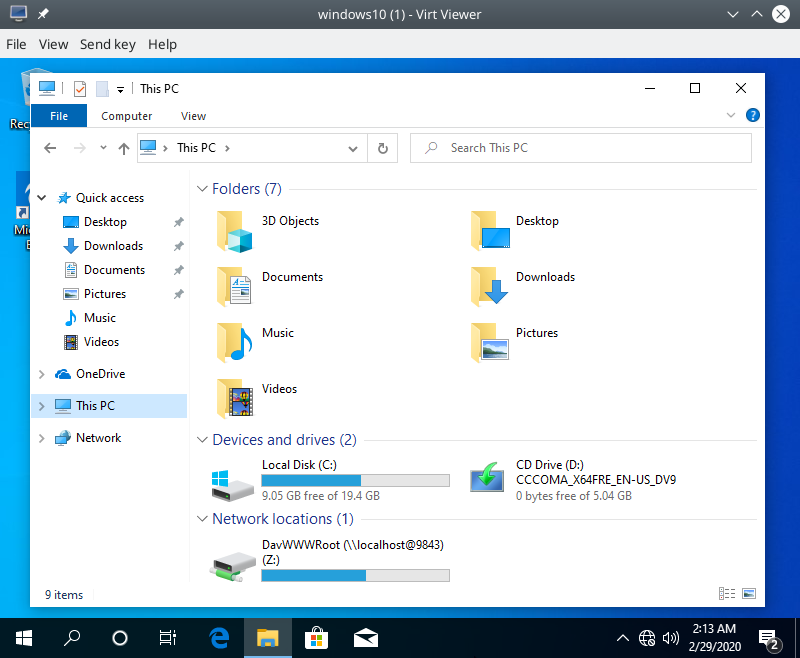
You should see your shared directory as the network drive Z:
If your virt-viewer session is interrupted, you need to reconnect, reset your shared folder (File > Preferences) and reboot, to get your shared folder back, which is rather inconvenient.
I have written all this up because some things were quite difficult to discover, and I don't want you wasting as much time as I have done sorting things out. Linux is a great product, but has been marred by continuous sabotage. Imagine how impressive it would be without the sabotage. Although I have put a lot of effort into making sure that what has been said is correct, you should know that I am no Linux guru. And thanks to all those, mostly anonymous persons, who left valuable advice all over the internet.
And one last thing. To produce the PDF, I installed the package
apt-get install printer-driver-cups-pdf
Now, Firefox prints web-pages to PDF documents. Very nice.
It appears that more needs to be said.
The web-browser Konqueror actually has two engines. The default engine, QtWebEngine, does not allow you to save web-pages. In order to have this rather basic feature, you need to go to
Settings > Configure Konqueror > General > Default web-browser engine > WebEngine
and change WebEngine to KHTML. The same is true in Debian 5. Forthwith, Konqueror has the KHTML engine. When I printed this web-page to a PDF document using Debian 10's Konqueror, I found that the images embedded in the PDF were of amazingly poor quality. The text was fine but all the images were unrecognizable. Here is that PDF's presentation of the first image of this page.

Knowing that Debian 5's KDE is usually better than Debian 10's, I installed cups-pdf (Debian 5's version of printer-driver-cups-pdf) and printed this page to PDF using Debian 5's Konqueror. The result was quite acceptible, at least when when viewed in Debian 5's Konqueror, but showed strange lines on all the images when viewed in Debian 10's Firefox. In Firefox the first image of this web-page looks like this:
All this demanded a little investigation. After asking various people which programs were most useful for investigating PDFs, I ended up installing these
apt-get install pdftk-java poppler-utils imagemagick qpdf
apt-get install libopenjp2-7 libopenjp2-tools
The first three have been very useful. I am yet to use qpdf, which seems most useful for encrypted PDFs. The OpenJPEG packages are needed to handle JPEG2000 image files. Let's call the PDF produced by Debian 5's version of Konqueror, deb5.pdf, and the PDF produced by Debian 10's version of Konqueror, deb10.pdf. The first image was on the 4th page of both PDFs, so I extracted and uncompressed page 4 from both PDFs with the commands
pdftk deb5.pdf cat 4 output deb5-4.pdf uncompress
pdftk deb10.pdf cat 4 output deb10-4.pdf uncompress
I listed and extracted the images from deb5-4.pdf with
pdfimages -list deb5-4.pdf
pdfimages -all deb5-4.pdf a
The first command lists the images. The second extracts them. I found that the original image had been cut into 23 horizontal segments which were then embedded separately in the PDF and positioned to show as one image. This worked well for deb5-Konqueror but not for deb10-Firefox which showed lines between the 23 images. The reason for this sabotage? Who knows?
I listed and extracted the images from deb10-4.pdf with
pdfimages -list deb10-4.pdf
pdfimages -all deb10-4.pdf b
This time the image was cut into 129 irregularly sized rectangular pieces which were embedded separately in the PDF and positioned to show as one image. The reason for this sabotage? Who knows? One assumes the incredibly blurred images are just "in your face" sabotage.
All the images were embedded in the PDF as follows
6 0 obj
<<
/ColorSpace /DeviceRGB
/Subtype /Image
/Height 27
/Filter /FlateDecode
/DecodeParms
<<
/Columns 800
/Colors 3
/Predictor 15
>>
/Width 800
/BitsPerComponent 8
/Length 1116
>>
stream
A DEFLATE COMPRESSED IMAGE GOES HERE
endstream
endobj
The compression method used is called Deflate, which is also used in zip, gzip and PNG files. This method is indicated by the line
/Filter /FlateDecode
I have not been able to discover much more about how Deflate/Zip compressed images sit in a PDF, but I have found out that JPEG files sit in the PDF unchanged, as do JPEG2000 images. You simply write some metadata before and after the images. For example, if you take the second image above, 002.jpg, and insert it at the place indicated below, then the resulting PDF will display the image 002.jpg on the first (and only) page.
%PDF-1.3
1 0 obj
<<
/Type /Catalog
/Pages 2 0 R
>>
endobj
2 0 obj
<<
/Kids [3 0 R]
/Type /Pages
/Count 1
>>
endobj
3 0 obj
<<
/Contents 4 0 R
/Type /Page
/Resources
<<
/ProcSet [/PDF /Text /ImageC]
/XObject
<<
/Im0 5 0 R
>>
>>
/Parent 2 0 R
/MediaBox [0 0 800 600]
>>
endobj
4 0 obj
<<
/Length 31
>>
stream
q 800 0 0 600 0 0 cm /Im0 Do Q
endstream
endobj
5 0 obj
<<
/ColorSpace /DeviceRGB
/Name /Im0
/Subtype /Image
/Height 600
/Filter /DCTDecode
/Type /XObject
/Width 800
/BitsPerComponent 8
/Length 25347
>>
stream
THE UNCHANGED JPEG COMPRESSED IMAGE 002.jpg GOES HERE
endstream
endobj
xref
0 6
0000000000 65535 f
0000000015 00000 n
0000000066 00000 n
0000000125 00000 n
0000000289 00000 n
0000000373 00000 n
trailer
<<
/Root 1 0 R
/Size 6
>>
startxref
25902
%%EOF
The compression method used is JPEG. This method is indicated by the line
/Filter /DCTDecode
where DCT stands for Discrete Cosine Transform.
I used the command line graphics program ImageMagick to produce a PDF from 002.jpg with
convert 002.jpg 002.pdf
I expected the PDF to be 002.jpg (without change) wrapped in metadata similar to the above. However, another image of the same width, height, and general appearance, but larger file-size, appeared in the PDF. This new image was almost certainly 002.jpg recompressed. Such a recompression is not only totally unnecessary but also degrades the image. It seems this was done to hide the fact that JPEGs can embed into PDFs without change.
A PDF Object containing a JPEG2000 image looks like
6 0 obj
<<
/Type /XObject
/Subtype /Image
/Name /Im0
/Filter /JPXDecode
/Width 800
/Height 600
/ColorSpace /DeviceRGB
/BitsPerComponent 8
/Length 8856
>>
stream
THE UNCHANGED JPEG2000 COMPRESSED IMAGE GOES HERE
endstream
endobj
The compression method used is JPEG2000. This method is indicated by the line
/Filter /JPXDecode
To obtain a PDF containing a JPEG2000 file I used the commands
convert 002.jpg 002.jp2
convert 002.jp2 002.pdf
Even though Firefox produces PDFs with visually nice images, even these images have been sabotaged. For some reason all the images are recompressed with a new width = the old width + 2 and a new height = the old height + 2. This is a totally unnecessary resizing of the images. All it does is increase the file size and obscure what is happening.
Other popular topics are:
The COVID-19 Scam. UPDATE
Proof that Adolf Hitler was a double agent.
A large collection of photos of Jewish political leaders, e.g., Nelson Mandela, Tony Blair, Gordon Brown, etc.
There are no ancient Jewish cities in Israel, but there are lots of ancient Greek cities.
WOW; Presidents Reagan, Clinton, Bush, Obama, Trump, and Biden are Jews.
Is it too late to save Florida from Drowning? What will your beachfront property be worth in 50 years?
Proof that the name ADAM is of Greek origin.